Showing posts with label 3D crafts. Show all posts

Thursday, October 18, 2012

How many days to Halloween? *UPDATED*

Halloween is just around the corner and if you have a little one like mine, I have to give the countdown daily. My B lives form holiday to holiday with birthdays sprinkled in...so I had to devise something I could make to handle all this counting down!
 This was my first attempt and as you can see the boxes fit snug within the outer box....I ahd to fix it bx adjusting the file, but that was OK since I needed another for our other Halloween tradition of "BOOing" our neighbors. For the first calendar I made new boxes and then a new outer box a bit bigger for the second one.

I was able to make print and cut patterned papers with the Chillingsworth Manor digital paper collection from an Echo Park Digital kit I got from JessicaSprague.com. They have a Wednesday deal each week that makes it digital addictive!

For each of the back pieces I used different sets of SVG's. The top one was from LetteringDelights.com. Using the Simple shapes set from the vinyl decorations...LOL
 This one was made using the same difgital kit for the papers and then using SVG's from SVGcuts.com. I think the white contrasts too much and I need to soften it a bit with some inking or something, suggestions welcome!

This file needs some improvement and I also hope to come up with more styles for all year long...Believe me I will need a calendar for each event/holiday!!

Have a happy Halloween and check back for some more crafts soon!

UPDATE:
I was so grateful when I got the perfect solution in my comments, so I went ahead and put a moon behind the bat for a better look to the second calendar....love it! I used some shimmer spray and it looks really good IRL! Thanks CIndy@Scrap-obssesed.blogspot.com!

She has some really fun project there too and you should all check out her blog! I was so glad I did!

Thursday, May 24, 2012

Teacher's Gifts- The end of the year...

Yes,, I took this picture in my car right be fore school LOL
This year my youngest started preschool and I wanted to thank her first ever teachers for the great job they did. Conversations with my daughter didn't lead me to anything really good for them, so we settled on several gift cards. B couldn't decide. She wanted to give them a million dollars((lottery tickets) and also her favorite, pink donuts (Dunkin gift card). Plus she decided a dinner out would be great since donuts aren't healthy (Applebee's gift card) and also some good books to read (Barnes and Noble's gift card). Luckily it didn't add up to too much since I was able to get a multipack to slit up.

I was also happy to be able to make the simple 3D book gift card holder that is similar to the ones our committee made for the elementary school teacher appreciation week gifts. Those are shown in the previous post, and now I can include directions and possibly manage to attach the file for sharing too! :) I have to add that I was inspired to create this by the book files from SVGcuts.com and I do indeed own those files, But I wanted to create a file that was simple to make in mass quantities and sized for a gift card., so I created this file by putting together basic shapes.

For these gift card books I added some different decorations to the front. I hope they look like mini books...do they? My decorations on the front are a print and cut made with two Lettering Delights files. The font(LD Vertical trainer) wasn't looking good as it was imported into MTC directly so I started a word document and made the red outline box by creating a table of 1X1 and then changing the border. I placed the text into the "table" after I installed the font and simply typed in the text. Next I saved the file as a PDF right from Word and then imported it into MTC. I did have to change the color to red one imported but it looked great after that one simple step. The pencil is from the Pop School Graphics Set I believe. They have some great images!!! The last step before cutting was to created a shadow then do a simple print and cut. Look ho awesome the small pencil cut!!!  I used dimensional tape to layer the pieces and finished it off with ribbon. (of course)

So now, in great detail I'll show you how I put this box together.....

The outer "cover" is cut at 6.25 X 4.5 inches and scored at 2.75 and 3.5 inches for a 1/2 inch "spine"

It'll make sense when you have your own in hand...promise.
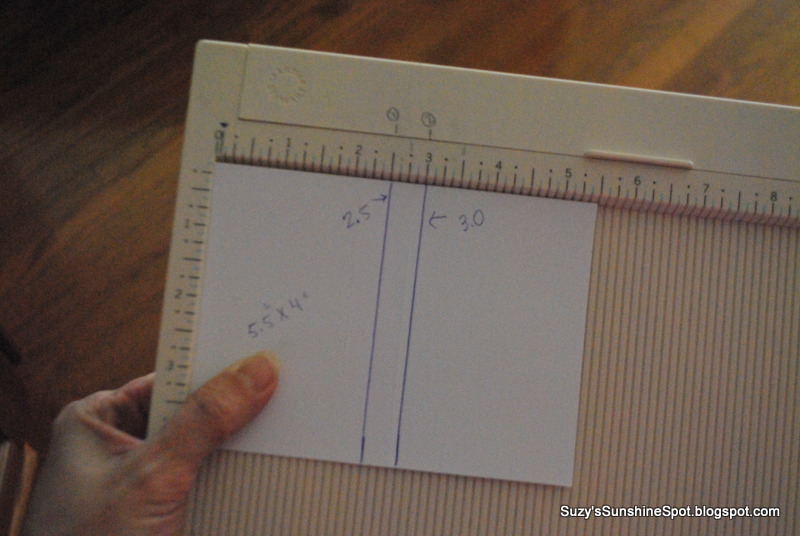
This is the piece included in the file. Simply fold at the score marks to make a start of the "box" that represents the pages. The half circles fold in to help close the whole book at the very end and there is a bottom and some side tabs. You'll need to glue a rectangle into this after folding it all into shape. The rectangle should be 5.5 X 4 inches and scored at2.5 and 3.0 inches.
Sorry for the bad pic. :(
After you fold all the pieces a the score lines, simply glue it together to form your inside box...
this is just the rectangle glued to the bottom tabs...see the the half circles that are sticking up here?
 You want this to fit exactly into the corners nice and snug!

This is what the bottom will look like.
 See the rectangle tabs sticking out? These need to be glued to the sides of the rectangle as you fold it into shape.
This is the box bottom an the top cover ready to go.
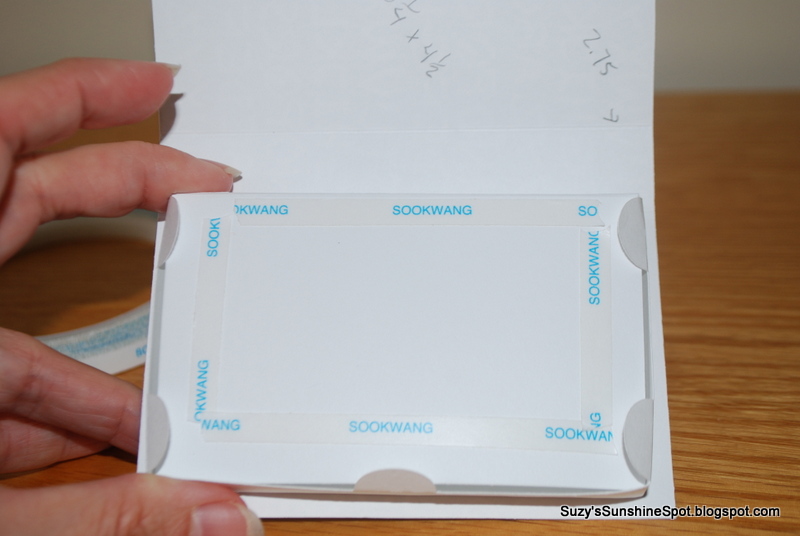
Place some strong adhesive along the edges of the bottom. Be sure to put adhesive very close to the edge on the side that goes up against the books "spine"

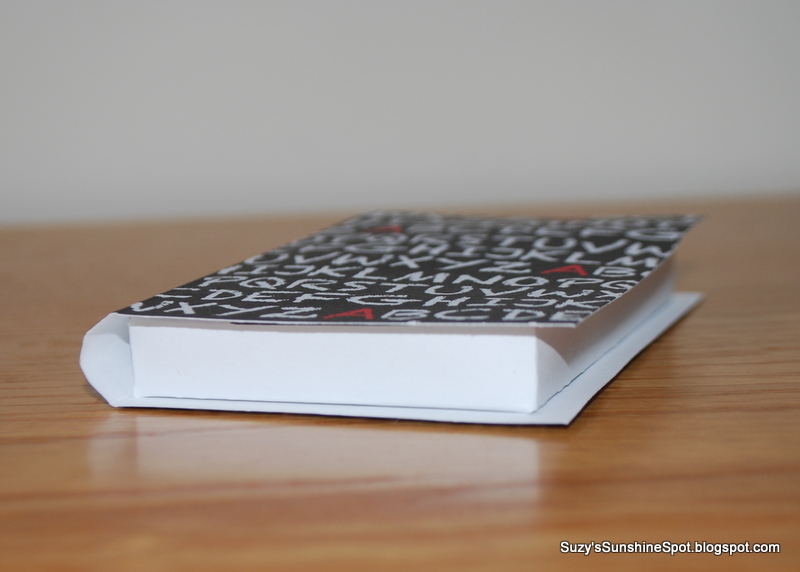
This is where it et's a bit tricky but only a little. You might have noticed that I left a "spine" of a half inch on the inside "box" and a "spine" of 3/4 inch on the outside cover. This is not an accident! The difference in sizes creates the rounded section common to real books. This is why you need to be careful in the next few steps.


Place the bottom of the "box" right up to the edge of the score mark representing the inside of the back of the cover. Press it down firmly and make sure it holds tight for the next step.


Place your adhesive for the top inside cover just inside of the tabs so that you leave space to tuck those tabs in later. Be sure side that will be up against the spine(on top here) has adhesive right at the edge.

Place the edge of the "box" up against the scored line on the cover so that the spine is formed with a rounded shape. I gently rounded the paper first by bending it around my finger before assembling mine. Press firmly so it stays in place.
The"tuck"

Fully assembled, but not decorated...
Tuck the tabs into the top cover once you have your gift cards inside and Viola! A 3D book that's a gift card holder!!

MTC file HERE
SVG file HERE and HERE for the pages...make sure the overall sizes are correct. The element that creates the pages should be 10" long. The dimensions are in the blog for the cover etc.

Tuesday, January 24, 2012

Welcome Love

I sized these at about 7inches tall and they ended up almost 2 inches thick.
The tradition of Valentines Day is one of my favorites. It's fun to support my little ones as they trade cards and treats with their classmates and friends. But even more, after New Year's tradition of self examination, it is refreshing to just look outside ourselves and welcome love into our lives!


The solid paper is all Bazzill basics and the print is the DCWV baby girl stack.
It was my goal last year to put up a banner for each holiday or season but since you haven't seen them here you can probably guess that it didn't happen....So, when the idea pepped up to create these 3D letters for Valentines day, I wanted to figure a way to make it into a banner. This super satin ribbon from thepapermart.com was left over from my little princesses party and it was wide enough to support LOVE. :)

It was actually quite easy to put together these letters but I suggest some quiet so that you can think through them before you glue it all down.  Say for instance don't do these while trying to help with homework since yours might end up like my E which has the paper "technically" inside out. LOL.

I actually have only one tip for the construction of the letters. I used my long clear ruler when gluing the side portions of the "O" together. It doesn't have score marks on the flaps where it's glued so in order to be sure they weren't getting wonky, I  laid my ruler down with a few of the flaps turned up. This made it easier for the next piece to line up without going crooked.


The SVG files for this project all came from the SVGcuts.com website and they do a spectacular job with their files, and also customer support by including great instructional videos right on the site.

"Be Mine" was from the 24Valentines collection, and the bird was and extra from the Bunny House Treat Box set. B wanted a bird on it. Finally I made the "rosebud" from part of the file for roses included in the "crush on you" set. It was designed to be a fuller style rose but I was wanting just a bud so just used on portion of the file...I managed to scrounge the leaves from the 3D flowers collection and finished it off with some plain white ribbon. The banner could probably be embellished even, more but I just wanted to keep it simple. And get it done. :)

I hope you all welcome love into your lives this year and have a wonderful Valentines Day!

Wednesday, January 11, 2012

Chinese New Year Craft-Spin Drums

It has  taken me awhile to warm up to 2012, even though it has some really cool things going for it. I mean seriously, it it the last time in my lifetime I will be able to enjoy a date like 1/1/1, 2/2/2, and so on. This year is gonna be 12/12/12 at the end of the year and well, it's a bit sad we won't see 1/1/1 until January 1, 2101! That's 89 years folks and I hope my DD's get to see it.

I was glad to see it's not too late to celebrate the New year! The Chinese New Year on January 23 that is. So I have a project....Chinese Spin Drums! I made these with my Brownie Girl Scouts, and will make a few more for home too since the are so much fun. I'll show you how to make yours and also share the cutting files below. I found the idea on FamilyFun.com and adapted it to make it fit my needs. The one below has a dragon cut from the Chinese New Year SVG set from SVGCuts.com....
The dragon cut so well on my Zing, despite the tiny bits due to being about 2.5 inches tall Great file!


OK so here is how I made the spin drums!

 You'll need the 6 cut pieces from the file: two large circles for the ends of the drum, the center band, the two end decorations(mine have Chinese dragons downloaded from the internet and printed on) and the little "pizza table" style cut piece shown in white here...Also about 14 inches of yarn, a Japanese style round chopstick, two beads, a piece of ribbon. And glue!
I drew in the score lines here to show where the "pizza table" goes and what the different holes are for
 First fold the funny pizza table looking thing so that it stands up a bit and has tabs at the end. Place a glue dot in the center of the square created with the score marks on the red piece of paper. Then glue the tabs of the table onto either side of the square, but don't push the "table" down...instead let it sit above the red paper.
 Place a glue dot in the center of the square. Then glue the tabs of the table onto either side of the square, but don't push the "table" down...instead let it sit above the red paper.
Overlap the ends of the long strip glueing it down and be sure to get the holes lined up and the edges flush.
 This is where the chopstick goes into the drum. Be sure to put the flat edge in first.
 The chopstick should be snug within the hole and then go through the pizza table too. Place your hand on top of your drum and push the chopstick firmly onto the glue dot.
 The tie the yarn or string right to the middle of the chopstick so that there are equal amounts on either side.
 After threading the yarn through the side holes make sure the "drum" portion is well rounded by adjusting it a bit and then tie a knot to help it keep it's shape. Do this on both sides and make it snug. This is important to help keep the whole thing form getting loose as it spins too.
 Fold the flaps of the long strip in a bit and put glue on the tabs.This shows the yarn tied and also the tabs gently folded in. This view looks through the inside of the drum and the glue goes on the outside of the tabs so turn i over to apply the glue evenly.
Be sure your glue is all the way to the edges of all the flaps for it to be secure. Place the large circle on the end and fiddle till your happy with the fit. It wont be perfect but it should be even.

 Once the end piece is a set a bit, turn the whole thing over and use a pen or something to press the tabs down.
 Mark the place for the bead with a pen by bringing it up and measuring(eyeballing) where it meets the center of the drum. Then tie a bead on each end where the mark is.

 Decorate the smaller circle with a fun drawing or print out and enjoy!
  It works best if you hold it between your hands with your palms flat and rub them like you are trying to warm up...My little one had fun demonstrating! :)
Here are files: Just for reference the largest circle should measure 3inches.
For SCAL just import the SVG...if you do not own an electronic die cutting machine, the PDF can be printed and cut by hand. Then use a hole punch where required.
MTC
SVG
PDF

add this to your Pintrest Board...
Pin It


Thursday, December 22, 2011

Crafting in the car and other Holiday Fun!


I think he's my favorite project!More below....
OK so I tend to get a bit rushed during the Holidays, and this year is no exception. This year I have three girl in three different schools! So, I had to finish the goodie bags for my littlest one in the car while she went into her preschool class...it was only putting things in bags and tying on tags but this just might be the closest I've come to not finishing! SO here I am finally to share some of my Christmas crafts with everyone...enjoy, maybe next year I'll be ahead?
I did manage to snap a quick pic of the goodie bags LOL. These are the best thing since white paper lunch bags, clearly! Just maybe my new love...Inside are some cool tic tac toe mini games and some cute tissues B picked out. Both from the dollar section at Target. But the best thing of all you'll see in my next picture. Candy cane spoons! Everyone I gave them to, young and old went crazy fro them. I got them way ahead of time in mass quantities(we're talking free shipping) way ahead of Christmas since I knew they were a must have. Loving Oriental Trading Company this year!

So this is what I did with them....a mug with a coco package and a small baggie of mini marshmallows. If you look closely some of the mugs have snowman shaped ones from WalMart. The girls said the French Vanilla taste wasn't so good so I tried to give them mostly to adults though.

I am sharing the SVG file for this paper mug below....

We made coco cups for all the girls specials teachers(music, art, etc.) and the main teachers all got a mini bucket of extras too. I made a set of hand-warmers(same as last year but with real organic lavender oil) and a set of aloe infused spa socks as a cupcake...are you feeling the warm fuzzies yet?

Somehow K was recognized as the girl who gave out hand-warmers last year as gifts so her new teachers for this year got their own lavender and vanilla infused ones...the men got vanilla, and the one teacher who she had last year got another set his since wife took his. :) Sorry somehow no pics of those. Check last years post for some info if you'd like.
I make "the savages" help out. It's for their teachers, and then they are proud to deliver the gifts.
 I like to work in stations with an assembly line approach so I took over the dining room and the girls all helped, but somehow it was as hectic as last year and the year before. Then as I was finishing the last few items I had an epiphany...in just two years my little one will need gifts for her specials teachers on top oof the two preschool ones this year...and they'll likely have to be different since she'll be at the elementary school with G. Well, luckily K will have all new teachers so it's hand-warmers part three! :)

But here's my favorite project of all so far....a few ornaments. I helped my daughter make a set of ornaments for our Girl Scout gift exchange. She made a set of Ravens ornaments and a Monogram one in the girls favorite color. They were a hit! Because we have an odd number of girls I exchanged with one of the girls and made a Ravens one, a monogram one and also this little snowman. He wasn't a complete success at first but after a happy accident he turned out sooo cute!

These are plastic ornaments swirled with Glitter it glue then we put in Martha Stewart's glitters. After that I cut out images and lettering from white vinyl using MTC to import and SVG. I should have used the wrap function in the program but instead snipped the image a bit to make it fit...next year huh?
For my little Ravens fan friends..

I need to make more of these!He swings around so nicely.
Now for this guy.  He was a disaster at first! I initially used MTC to print, then cut his image from a plastic sheet that was supposed to work in the inkjet printer.(Image from Lettering Delights) I punched a small hole in his hat and used white thread to make a hanger for him. After I bent him and put him through the top of the ornament he popped back into shape as planned, so I used a glue dot on the inside of the top to get him to hang just right.....He looked fine at first. Actually he looked awesome. Then when he was unwrapped and all of his ink had come off! So, back to the drawing board. I ended up doing a print and cut on paper with another image flipped for on the back. I then just took the plastic part out and adhered the paper snowman to the plastic. This allowed me to bend it to fit into the opening but then it popped right back into shape after it was inside! I really want to make more of these!!

OK so here is my oh so simple mug file... I sized it so that the bottom was just shy of 3". It is way far from perfect. To make the mugs I folded the tabs in and started from the one right at the edge. Next I followed the curve just taping the tabs down to the circle using ATG tape and ending up overlapping the last and first tab a bit on the inside of the mug. Next I placed the second circle on the bottom of the mug to cover the tabs and give it some stability. The overlap f the paper is also to give it some strength. I used fairly ugly and plain Astrobrights cover stock left over from another project.

Here's a few step by step pics...I glued the handle together then spread the tabs to put them on the mug with Scotch quick dry glue. For next year I am thinking of making a slit to fit the tabs through.


SVG for mug on 4Shared
MTC for mug on 4Shared


*Or maybe these are my favorite project...hmmm decisions decisions...

Thursday, November 24, 2011

For the season of Thanks and Giving

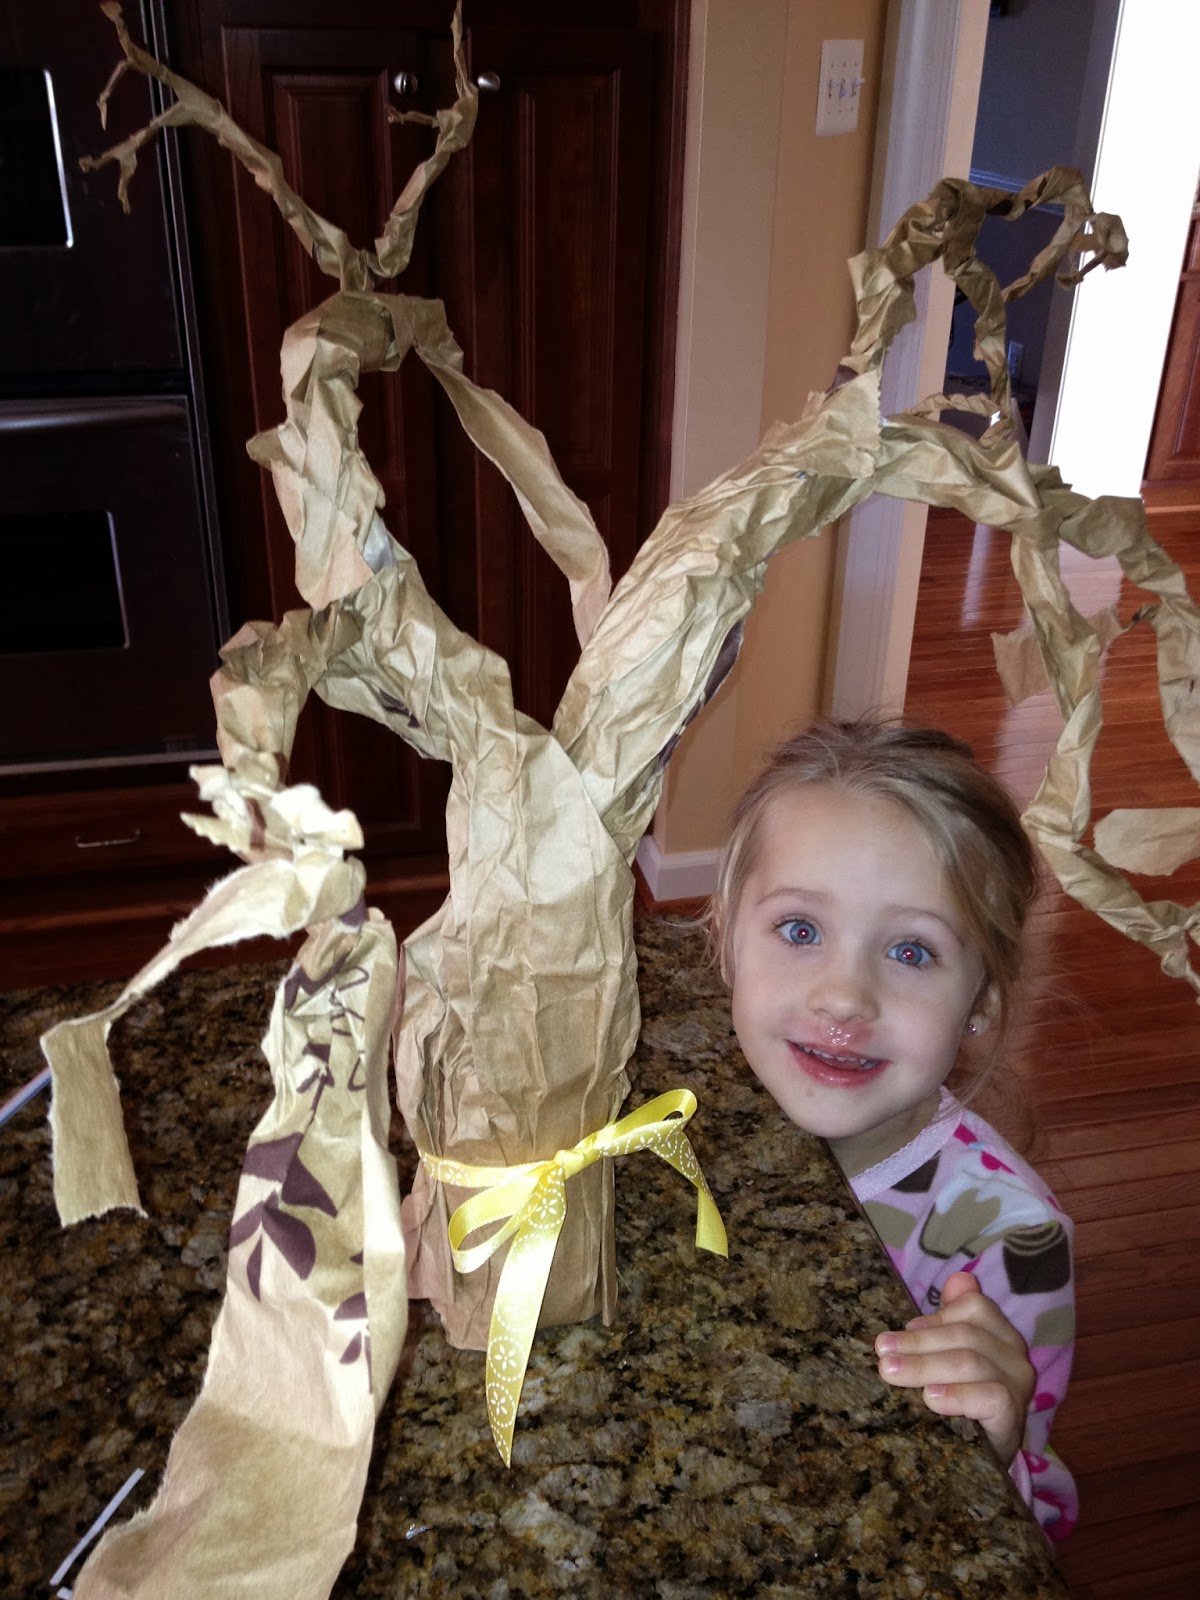
Our tree full of leaves and with  a yellow ribbon in honor of soldiers sailors and airmen still deployed.
This tree represents one of the most wonderful memories to be etched into my heart.

In order to bring a sense of gratitude to the Holidays I wanted to create something unique.  Since I had recently seen a "spooky tree" made from paper bags on the FamilyFun.com site for Halloween it popped into my mind that it might make a good gratitude tree. I decided to try it on a larger scale suing several large shopping bags.

This is our tree before the leaves...
Unfortunately a blog accident has left me with now pictures of the prcess so I'll try to describe as best I can how I made this tree. First I cut down one side of a large paper grocery bag then cut around the bottom to create a sigle flat piece. I tore this in two so that I had two long pieces to work with. For this tree I used two bags which gave me four longer pieces.(woohoo I found some iphone pics)

Next I taped the pieces overlapping to cover a sauce jar, I think Ragu pizza sauce but I could be mistaken. LOL Then, using a spray bottle of water I lightly misted the strips and twisted them around until I felt it looked right. It was a make it up as you go along kind project after all.
Here's how it started out:

 Then, using a spray bottle of water I lightly misted the strips and twisted them around until I felt it looked right. It was a make it up as you go along kind project after all.
 Next I decided the center needed some support so I grabbed a bit of everything in the kitchen drawer. I think what worked best was bamboo kitchen skewers for the center and straws for the limbs. You can't tell but they are inside there...and I just taped it all together the best I could with double sided tape inside some sections.

 After the trunk started to dry it became a bit more stable. The rest of the tree was simply created by dividing and twisting the four strips into two or three smaller sections over and over, allowing the tree to "branch out" and take shape.


The leaves were cut using my Cricut Expresssion, but I am not sure of the cartridge. Any simple leaf shape will do. I used several colors and sizes just for fun.

This last part is my favorite. :)

At first I was thinking the project turned out pretty but not as effective as hoped. I sat down with the girls and explained the idea of writing on the leaves and soon they thought of a few things and put a few leaves on. Well I wasn't overwhelmed with the initial response frankly and had hoped for better.

But after Thanksgiving dinner was all done and everyone was puttering around the house doing various things. I spied G (my intense middle child) in the dining room writing. I was so surprised when she told me she was filling in the tree! Slowly and quietly my other two girls joined us as we had a more heartfelt discussion and filled nearly every speck of the tree up. This was a moment a Mother lives for! Best day ever!

*Note:This is a rewrite of my original post which got accidentally deleted. :( Sorry to say this isn't as good a tale as the original but I still wanted to share this with my readers.

Thanks for stopping by and adding your thoughts....

Blogaholic Designs”=