Showing posts with label teacher gifts. Show all posts

Thursday, December 22, 2011

Crafting in the car and other Holiday Fun!


I think he's my favorite project!More below....
OK so I tend to get a bit rushed during the Holidays, and this year is no exception. This year I have three girl in three different schools! So, I had to finish the goodie bags for my littlest one in the car while she went into her preschool class...it was only putting things in bags and tying on tags but this just might be the closest I've come to not finishing! SO here I am finally to share some of my Christmas crafts with everyone...enjoy, maybe next year I'll be ahead?
I did manage to snap a quick pic of the goodie bags LOL. These are the best thing since white paper lunch bags, clearly! Just maybe my new love...Inside are some cool tic tac toe mini games and some cute tissues B picked out. Both from the dollar section at Target. But the best thing of all you'll see in my next picture. Candy cane spoons! Everyone I gave them to, young and old went crazy fro them. I got them way ahead of time in mass quantities(we're talking free shipping) way ahead of Christmas since I knew they were a must have. Loving Oriental Trading Company this year!

So this is what I did with them....a mug with a coco package and a small baggie of mini marshmallows. If you look closely some of the mugs have snowman shaped ones from WalMart. The girls said the French Vanilla taste wasn't so good so I tried to give them mostly to adults though.

I am sharing the SVG file for this paper mug below....

We made coco cups for all the girls specials teachers(music, art, etc.) and the main teachers all got a mini bucket of extras too. I made a set of hand-warmers(same as last year but with real organic lavender oil) and a set of aloe infused spa socks as a cupcake...are you feeling the warm fuzzies yet?

Somehow K was recognized as the girl who gave out hand-warmers last year as gifts so her new teachers for this year got their own lavender and vanilla infused ones...the men got vanilla, and the one teacher who she had last year got another set his since wife took his. :) Sorry somehow no pics of those. Check last years post for some info if you'd like.
I make "the savages" help out. It's for their teachers, and then they are proud to deliver the gifts.
 I like to work in stations with an assembly line approach so I took over the dining room and the girls all helped, but somehow it was as hectic as last year and the year before. Then as I was finishing the last few items I had an epiphany...in just two years my little one will need gifts for her specials teachers on top oof the two preschool ones this year...and they'll likely have to be different since she'll be at the elementary school with G. Well, luckily K will have all new teachers so it's hand-warmers part three! :)

But here's my favorite project of all so far....a few ornaments. I helped my daughter make a set of ornaments for our Girl Scout gift exchange. She made a set of Ravens ornaments and a Monogram one in the girls favorite color. They were a hit! Because we have an odd number of girls I exchanged with one of the girls and made a Ravens one, a monogram one and also this little snowman. He wasn't a complete success at first but after a happy accident he turned out sooo cute!

These are plastic ornaments swirled with Glitter it glue then we put in Martha Stewart's glitters. After that I cut out images and lettering from white vinyl using MTC to import and SVG. I should have used the wrap function in the program but instead snipped the image a bit to make it fit...next year huh?
For my little Ravens fan friends..

I need to make more of these!He swings around so nicely.
Now for this guy.  He was a disaster at first! I initially used MTC to print, then cut his image from a plastic sheet that was supposed to work in the inkjet printer.(Image from Lettering Delights) I punched a small hole in his hat and used white thread to make a hanger for him. After I bent him and put him through the top of the ornament he popped back into shape as planned, so I used a glue dot on the inside of the top to get him to hang just right.....He looked fine at first. Actually he looked awesome. Then when he was unwrapped and all of his ink had come off! So, back to the drawing board. I ended up doing a print and cut on paper with another image flipped for on the back. I then just took the plastic part out and adhered the paper snowman to the plastic. This allowed me to bend it to fit into the opening but then it popped right back into shape after it was inside! I really want to make more of these!!

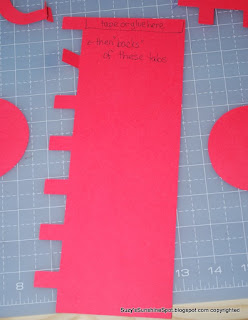
OK so here is my oh so simple mug file... I sized it so that the bottom was just shy of 3". It is way far from perfect. To make the mugs I folded the tabs in and started from the one right at the edge. Next I followed the curve just taping the tabs down to the circle using ATG tape and ending up overlapping the last and first tab a bit on the inside of the mug. Next I placed the second circle on the bottom of the mug to cover the tabs and give it some stability. The overlap f the paper is also to give it some strength. I used fairly ugly and plain Astrobrights cover stock left over from another project.

Here's a few step by step pics...I glued the handle together then spread the tabs to put them on the mug with Scotch quick dry glue. For next year I am thinking of making a slit to fit the tabs through.


SVG for mug on 4Shared
MTC for mug on 4Shared


*Or maybe these are my favorite project...hmmm decisions decisions...

Friday, May 6, 2011

Teacher Appreciation Week, Part 3


Well the last few gifts are done and Teacher Appreciation week is almost over. Yesterdays take in for the teachers was "fruit", while the the days big treat was a take home dessert.

G took a small container of blueberries to her teacher since she found out they were her favorite color (again with the color lol) and I hope she likes them. I saw the tape holding the blueberry container closed and knew it would come in handy! I simply used a scrap piece of cardstock and a printout sentiment punched out with the sticker on it, and just a sharpie to ink the edges...fast and easy!

For the dessert, I made some Apple Caramel coffee cake and embellished with some printed cutouts from Kates Kitchen and my Imagine. I cut down the chef's head and put the dessert saying on instead. :) I put that and the 100% little label on with pop dots and taped it all down! Found an easy way to keep plastic wrap in place by accident! I put one plate under the food, wrapped it up, then put another under that to hold everything in place. Definitely gonna have to use that again!

Lastly, our cards. Today, my DD and I sent in "notes" for the teacher. My G was very adamant  about the look of the card and wanted to do an A+ card she saw in the April Cricut Circle  Magazine, but she needed much more space to write, so she allowed some design changes. LOL! She picked out the papers and allowed me to put it together...She used every bit of the 8.5X5.5 space. G loves her teacher who she's had for two years now. This teacher is possibly one of the few lovely ladies who loves my G back nearly as much as I do. G is a bit of a character (think Ramona, Junie B Jones) and it takes a special teacher! We will miss her a ton!
So, finally my card to her teacher. Sad to say but after making 5 gallons of lemonade and running to the store at 5AM for ice, etc for the luncheon, I didn't leave enough time for her card. So I found this pretty flower partially made and just winged it. I cut the background, the butterfly and the sentiment out quickly not judging the sizes well apparently. :) Throw a few pop dots under the elements and Viola! SO this is what I came up with....not really any worse than one I would have slaved over and torn my hair out for, so this might be my new modus operandi!

Best of all it left time for my handwritten note. I put one of my favorite quotes inside. "We can do no great things, only small things with great love" by Mother Teresa. I surely know that when my daughter's teacher came into school each and every day, with very small actions but with great love of teaching and children, she had a great big impact on my daughter and me too. Thanks to all of you teachers out there who truly make a difference each and every day!!

PS  Look at how proud my teachers would be, using French, Latin and my lemonade escapade required lots of serial conversion and math!! :) Um, but please don't check my punctuation and grammar. Enjoy your day everyone!

Wednesday, May 4, 2011

Teacher Appreciation Week, Part 2

This was filled with Dove Chocolates!
This was for "school supplies" day
 Every year I work with the PTA to provide a week of appreciation for out Elementary teachers...but in the past that meant I would only give my daughter's teachers a note and a small token at the end of the week. This year I wanted my daughter to be able to take something in each day!

Our PTA sends home a note to parents giving them a suggestion for a small gift for each day. Monday was cut flowers(no picture sorry). Tuesday was sweet treats, Wednesday is "school supplies. Since I never seem to post until after the holiday I wanted to show what I've made so far...

Monday was a mad dash for my G to go out and cut five red tulips from around "her" tree. A tree we planted just for her, so she was excited to do it. I simply wrapped them in white tissue paper and tied it up with some pretty red satin ribbon. A friend had posted a link to a blog that supplied me with a PDF of tags. Of course she made some fabulous cupcakes you can see here at LivingLocurto.com. But I just printed the page on card stock and cheated by using my Stampin-up scalloped punch for the circular tag and stuck it on top of the ribbon LOL.

The next day was a box from Wrap-it-up cartridge cut at the max, 11.25 inches I believe. It was so easy to just put the red and green behind the apple cut out, and then I decided my project needed a bit more so I added ribbon and some faux stitching. Not so neatly, and after I saw the pic I noticed I missed one side! Opps! So the teacher was thrilled and G was thrilled, since my G did a bit of sleuthing to find out her teachers favorite color was that blue. :)

So Tuesday is "school supplies" day. Originally I wanted to do some very different projects but a sick kiddo necessitated some quick re-planning. It's OK, I had plenty of time to think while I lay awake with a three year old in bed with me. ;)
Just another view to show the sides....
 I did make the schoolhouse box I wanted from Wrap it Up again at fit to page...but I had to make a quick run to the grocery store of all places for some school supplies. I was thinking box mark, fancy paperclips, a clothespin magnet I saw someone else do. Alas, I had shrinky dinks and some odds and ends from the 24 hour grocery store at 5AM. I did find some magnet clips and paperclips and highlighters and post-its. Oh, and staples, which went unembellished.

The box needs very little tape and stand about 4 inches tall.


OK, so the box. It was a bit tricky to figure the layers. I wasn't too thrilled after all my planning to see the top portion had green showing through. :( Well the other layers I was able to fit and figure using design software, but it wasn't too easy.
Not thrill with the end result and I had to use my glue gun!

I like these apples. :)
My apple paper clips in a leftover bag and a topper. Before handwritten sentiment.


I was pretty happy with the magnetic clips but it took four tries to get the two of them finished And I had to break out my glue gun. Not my favorite tool. We just don't get along. As for the shrinky dinks, the white opauqe stuff just does not work well in the Imagine, but I found the "rough n ready" style which is roughed up on one side and looks slightly frosted is fabulous!

The apple is printed and cut from Kate's Kitchen on my Imagine. The apples on the white for the magnet clips are 4 inches while the clear ones on the paper clips are 4 and 3. I printed with best quality and both Matte and glossy finish settings and i didn't see too much difference in the finished product. It cut really well with a very sticky mat, on highest blade depth and highest pressure on 2 multicut. Honestly it may have cut through on one pass! The thing that made the biggest difference was creating an offset that was fairly wide to make the stem more secure. Some are cut closer to the apple and some with more of a border.

I also lowered the temp to 315 degrees instead of 325 as the package calls for since I was running back and forth to the Imagine and oven. I placed them on parchment paper and then placed another piece n top to keep curling at a minimum. I got these suggestions from the Cricut Circle blog and I think it really worked better than chasing the shrinky dinks around with the heat gun. :) It's much easier to time it right in the oven too. In the past I've found that overcooking them causes them to lose their shine, but they otherwise come out fine.

The paperclip apples I simply punched with a regular circle hole punch offset on the side, and then used a toothpick to push a small ribbon through after shrinking. It wasn't too difficult to tie a small knot then place them in a little leftover embellishment bag with a topper. I was most happy with this element of the project.

The two clips I got done are simply clipped onto the sides while the bag of apple paper clip/bookmarks are fit inside with the other supplies and tied together with a ribbon. Hope you enjoyed my projects!

Teacher Appreciation Week...Part 1

One of my springtime activities is the Teacher Appreciation crafted gifts from the PTA each year. There's a group of ladies who willingly help and craft about anything I throw at them! Together we assemble three gifts to place in the mailboxes on Mon/Tue/Wed. Then we put together a presentation for a gift card at the end of the year.

This year was a bit hectic but we managed to put together 84 of each gift! There is a set of three cards, a "pencil" made with a Hershey's Kiss, and a wrapped candy bar(not shown)...sorry for the poor pictures but they had to get out the door! :)

Fore the cards I used CTMH Fanfare collection papers and mixed it up with some stamps I've had. The basic blue with the stars is simply a cut from Stand and Salute cartridge and  some ribbon. The Sentiment and the red edges are cut the same size from Lacy Labels and then the red cut and offset. The final card has a CTMH sentiment and some of the leftover strips from the other projects. I was happy to be able to minimize the paper used and use almost every bit!

The pencil was a rectangle of yellow rolled around a mentos and a Hershey's kiss. I had seen some done with Rollos but the committee wanted to use a less expensive candy. It really was necessary to put a strip of tape onto the candy to hold it in, plus another bit to hold onto the kiss. I suggest using Rollos. LOL. Once we had it rolled up I put a strip of double sided scotch tape around it a bit from the end. That way i could place the pink on half of the tape and then the grey fit right under it. Just a bit of my favorite Sookwang tape held the edge of the strips of paper on the ends and along the last side of the yellow. These were probably the most challenging of the crafts.

The gift card holder is a 5 inch circle with the edges folded in. I scored them at 1.25 on three sides then secured it with a bit of tape and some ribbon. There is also a printed sentiment card in it with a stamped "picnic cloth." from a CTMH set. We had five teachers out on leave so they got a little "gift bag."

I think my favorite thing of all was working with some beautiful ribbon. It is from PaperMart  and you would never believe the price. I love to get some basic colors in bulk from them.The double sided satin was really soft and very pretty. I used a red and a white wide ribbon and then the striped for some fun...

Next my personal gifts to the teachers....

Thursday, February 3, 2011

Three Month's Projects! Cards, handwarmers, a new craft space, and some Imagine projects!

*Note: There will be a re-write of my original post which got accidentally deleted.So check back within a few days...still wanted to share this with my readers.

Sunday, July 11, 2010

June!

Wow, so much time has passed so quickly and I haven't even posted any of my Projects for the past two months. Hopefully you have all been too busy to check on my blog too! So, here are some projects I've managed to get done and get pictures of...
  • A mini purse from Cricut  Forever Young. I turned it about a quarter turn in DS and got it a bit larger on a 12by paper. Threw on some leftover tags laying around from the teachers gifts, and Viola! Cute for a 10minute project. One discovery here was that the sides of the purses do not go all the way up and little things are prone to fall out! The paper is a DCWV paper stack, Nanas Garden, I believe, and the ribbon is stash with some CTMH twine to tie the tag to the bow. I did not get a picture of the cute pillow box I tucked inside. It was from the Stampin Up Sizzix Die, and fit some rolled up money perfectly. All tied with ribbon of course. :)
  • Some quickie end of the year gifts for all the girls teachers. I used the Sizzix Bigz Die, matchbox, from Stampin up and just love it!! I could put two Giarhdeli chocolates (from the big bag) in each. I also found a trick online that gets the most from your paper. Use one 12X12 and cut at 6.5 down to 5.5in  then turn a quarter turn and repeat all the way around. You will get 4 6.5X5.5 pieces and a small square from the middle. I mixed and matched a few papers from a DCWV stack. Used the mini tag set and punch from Stampin Up, ribbon from a stash and some CTMH twine. Another helpful hint...I roll the twine between my fingers opposite the direction it is wound to separate it into individual strands. It goes a long way and looks more in scale with the tiny tags.
  • And this is where I realize I didn't get pics of my girls Birthday cards! Well I will get them. I didn't get any pictures from my girls cakes either as they were finished last minute as usual and they were nothing worth showing. LOL Hopefully I can play with my Cricut cake some more really soon and show something fabulous.
  •  OK one last thing....some yummy pancakes. The girls actually eat a mix of Hodgsen Mills Buckwheat pancakes and Bisquick. I add a bit of special pure vanilla extract and top with some strawberries crushed and heated with real maple syrup. Not too bad for you? :) We are so happy to be eating a great variety of fresh fruits and veggies from a local farm that participates in the CSA farm share program. We purchased a half share which means we pick up our share of the farms produce every two weeks. We've been happy to get enough to eat a enough to freeze for later too. *I promise to work on my photography skills too. :)


Thanks for stopping by and adding your thoughts....

Blogaholic Designs”=