Showing posts with label 3D paper craft. Show all posts

Friday, November 9, 2012

Thanks Coach!

This cut file was from My Creative Time LLC...oops that's My Time Made Easy LLC!
they have some great files...check them out!
Both my daughters play field hockey, and my youngest just finished up a great season.....the made it to the first round of the finals, but lost in the semi finals after a 1-1 tie, and overtime, and two more 2 tie breakers. It was a real victory for a team made up of more than half newbies! They were all disappointed after getting so far in the Hockey Fest but they surely weren't disappointed in their coach. 

The girls were so lucky to have a great coach. She was able to motivate them to want to win without getting too carried away. She made the game fun and had all the girls eager to practice and learn. Amazingly she taught them so much of the great basic skills! At the end of the season, the families pooled our resources to present her with a gift card to her favorite restaurant. I of course was happy to make a holder for her since that's what I do!
The gift card pops up when the box is opened!!!


Thursday, October 18, 2012

How many days to Halloween? *UPDATED*

Halloween is just around the corner and if you have a little one like mine, I have to give the countdown daily. My B lives form holiday to holiday with birthdays sprinkled in...so I had to devise something I could make to handle all this counting down!
 This was my first attempt and as you can see the boxes fit snug within the outer box....I ahd to fix it bx adjusting the file, but that was OK since I needed another for our other Halloween tradition of "BOOing" our neighbors. For the first calendar I made new boxes and then a new outer box a bit bigger for the second one.

I was able to make print and cut patterned papers with the Chillingsworth Manor digital paper collection from an Echo Park Digital kit I got from JessicaSprague.com. They have a Wednesday deal each week that makes it digital addictive!

For each of the back pieces I used different sets of SVG's. The top one was from LetteringDelights.com. Using the Simple shapes set from the vinyl decorations...LOL
 This one was made using the same difgital kit for the papers and then using SVG's from SVGcuts.com. I think the white contrasts too much and I need to soften it a bit with some inking or something, suggestions welcome!

This file needs some improvement and I also hope to come up with more styles for all year long...Believe me I will need a calendar for each event/holiday!!

Have a happy Halloween and check back for some more crafts soon!

UPDATE:
I was so grateful when I got the perfect solution in my comments, so I went ahead and put a moon behind the bat for a better look to the second calendar....love it! I used some shimmer spray and it looks really good IRL! Thanks CIndy@Scrap-obssesed.blogspot.com!

She has some really fun project there too and you should all check out her blog! I was so glad I did!

Thursday, May 24, 2012

Teacher's Gifts- The end of the year...

Yes,, I took this picture in my car right be fore school LOL
This year my youngest started preschool and I wanted to thank her first ever teachers for the great job they did. Conversations with my daughter didn't lead me to anything really good for them, so we settled on several gift cards. B couldn't decide. She wanted to give them a million dollars((lottery tickets) and also her favorite, pink donuts (Dunkin gift card). Plus she decided a dinner out would be great since donuts aren't healthy (Applebee's gift card) and also some good books to read (Barnes and Noble's gift card). Luckily it didn't add up to too much since I was able to get a multipack to slit up.

I was also happy to be able to make the simple 3D book gift card holder that is similar to the ones our committee made for the elementary school teacher appreciation week gifts. Those are shown in the previous post, and now I can include directions and possibly manage to attach the file for sharing too! :) I have to add that I was inspired to create this by the book files from SVGcuts.com and I do indeed own those files, But I wanted to create a file that was simple to make in mass quantities and sized for a gift card., so I created this file by putting together basic shapes.

For these gift card books I added some different decorations to the front. I hope they look like mini books...do they? My decorations on the front are a print and cut made with two Lettering Delights files. The font(LD Vertical trainer) wasn't looking good as it was imported into MTC directly so I started a word document and made the red outline box by creating a table of 1X1 and then changing the border. I placed the text into the "table" after I installed the font and simply typed in the text. Next I saved the file as a PDF right from Word and then imported it into MTC. I did have to change the color to red one imported but it looked great after that one simple step. The pencil is from the Pop School Graphics Set I believe. They have some great images!!! The last step before cutting was to created a shadow then do a simple print and cut. Look ho awesome the small pencil cut!!!  I used dimensional tape to layer the pieces and finished it off with ribbon. (of course)

So now, in great detail I'll show you how I put this box together.....

The outer "cover" is cut at 6.25 X 4.5 inches and scored at 2.75 and 3.5 inches for a 1/2 inch "spine"

It'll make sense when you have your own in hand...promise.
This is the piece included in the file. Simply fold at the score marks to make a start of the "box" that represents the pages. The half circles fold in to help close the whole book at the very end and there is a bottom and some side tabs. You'll need to glue a rectangle into this after folding it all into shape. The rectangle should be 5.5 X 4 inches and scored at2.5 and 3.0 inches.
Sorry for the bad pic. :(
After you fold all the pieces a the score lines, simply glue it together to form your inside box...
this is just the rectangle glued to the bottom tabs...see the the half circles that are sticking up here?
 You want this to fit exactly into the corners nice and snug!

This is what the bottom will look like.
 See the rectangle tabs sticking out? These need to be glued to the sides of the rectangle as you fold it into shape.
This is the box bottom an the top cover ready to go.
Place some strong adhesive along the edges of the bottom. Be sure to put adhesive very close to the edge on the side that goes up against the books "spine"

This is where it et's a bit tricky but only a little. You might have noticed that I left a "spine" of a half inch on the inside "box" and a "spine" of 3/4 inch on the outside cover. This is not an accident! The difference in sizes creates the rounded section common to real books. This is why you need to be careful in the next few steps.


Place the bottom of the "box" right up to the edge of the score mark representing the inside of the back of the cover. Press it down firmly and make sure it holds tight for the next step.


Place your adhesive for the top inside cover just inside of the tabs so that you leave space to tuck those tabs in later. Be sure side that will be up against the spine(on top here) has adhesive right at the edge.

Place the edge of the "box" up against the scored line on the cover so that the spine is formed with a rounded shape. I gently rounded the paper first by bending it around my finger before assembling mine. Press firmly so it stays in place.
The"tuck"

Fully assembled, but not decorated...
Tuck the tabs into the top cover once you have your gift cards inside and Viola! A 3D book that's a gift card holder!!

MTC file HERE
SVG file HERE and HERE for the pages...make sure the overall sizes are correct. The element that creates the pages should be 10" long. The dimensions are in the blog for the cover etc.

Monday, March 19, 2012

Leprechaun Traps


Thanks to my B who lives from holiday to holiday, this year we celebrated St.Patrick's Day to unprecedented levels! The girls were super excited to set up Leprechaun traps for the very first time. We read stories and did some research to find out: they are very tricky, love green, sweets, and golden coins. This was the perfect opportunity to make something fun! 

I first thought of a hat found in the Made in the USA kit by SVGcuts.com. It was an Uncle Sam's hat and before I had to struggle with mine, I saw Katie Wegner had made super beautiful leprechaun hat with it already, so I knew it would work. Her hat was fabulously decorated and you can see it at KtsAngels.blogspot.com. Ours were a bit more plain but it has a twist. A booby trap!

I also remembered a black pot from Party on Elm Street SVG kit. It's a Halloween set, also from SVGcuts.com. I was wanting to make this since it debuted and Mary from SVGcuts.com mentioned making a pot of gold right in the tutorial video. It was really sturdy and easier than I thought. Very lucky for us, since these are a big hit with the kids!

 For the black kettle I will mention some details that make it easier for everyone, especially MTC/Zing users. First of all when I imported the file I was sorta "stuck on stupid" and made some huge mistakes on sizing. I am not sure what happened since it was all a mess, so I highly suggest looking at the instruction PDF that comes with the set before you start. LOL 

Next, since I didn't like how deep the scoring cuts can be on some of the files. I worked out a way to keep the cuts from going all the way through. Here's my fix: First I use the edit/shape magic/break function and break apart any pieces that have scoring. After sending the outline of the shape to a new layer (down on the lower right use the "selection to new layer"which looks like a mini mat with a plus sign). Then select all the score marks and use edit/shape magic/join to group them all together. I leave the score marks and the outline on a separate layers and then when I make the first cut, hide the score marks only and use WYSIWYG mode. This way only the outline is cut. 

Then, without removing the mat, I hide the outline and un-hide the score mark layer (open and closing the eye in the layers box). When I go to cut the score marks, since I use WYSIWYG, I clicked the "use last" button for setting the origin and lower the pressure. This way, I get cuts that don't make it a the way through the paper to the back. 

On a side note, there is a sizzix eclipse feature that does this as well and I don't have a clue how it works but apparently there is a tutorial on the SVGcuts.com blog. I imagine there is also a way to work around this issue for other machine as well.

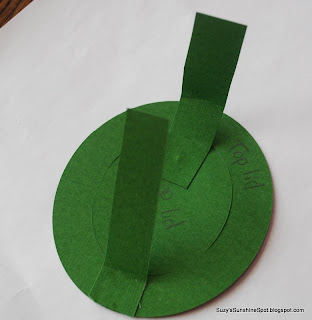
OK so in order to make the traps I made a few changes to the basic designs.  I had many wrong size tabs left over that fit nicely when trimmed, so I used those to attach the "false top" to the trap. I very conveniently also had a wrong sized bottom so this became my "false top." How lucky for me? LOL One tab attached the top to the side of the pot and the other lightly held it up. The girls wanted to put cupcakes on top, then suggested real gold but they settled for pennies luckily.
One tab was to attach it to the side.
The other tab attached to the inside of the pot to keep the "false top" in place.
Here it looks like a solid "Pot o' Gold" Hee Hee
For the Leprechaun hat I created a similar false top by cutting a new oval inside. I used edit/shape magic/shadow and when the box popped up I selected "inset shadow" and sized it using the slider bar, making sure the points of the side pieces would fit withing the ring, by eyeballing it. But I had my thinking cap on by then luckily and it worked out well. It was easier to glue the ring to the side than it usually is to glue a solid piece so I might consider this fact when I make other 3D items.

I used the same concept to attach the false top to the inside of the Leprechaun hat...The tab to hold the "false top" in place was too long in the picture below so it was trimmed to just enough to lightly hold the top up. The other tab needed to be long since it needed to be put in place after the ring was glued so it extended all the way to the side of the hat.

There was much discussion about how the Leprechaun would get onto the tall trap, how tall Leprechauns were, and how heavy and how much "gold" we needed to attract him. Also why they were all boys and if they had parents, but I sorta glossed over that part. ;)

Here's some construction pics:
See how nicely this fits together?

This shows how one piece attached to the top hat and the other was a tab to hold the top in place.
She made a very careful study of how many pennies to place on top before it was too heavy.
Un fortunately for us, the Leprechauns escaped our carefully designed traps. But, they left behind plastic and chocolate "gold coins" and chocolate gold and silver "bars"(Hersheys Nuggets). The girls allo found one gold dollar coin in each trap!
The next day the Leprechane had gotten out.
He got away and must have been in a hurry since he knocked the ladder down!


I made this bag for my teenager so she wouldn't be left out. This was from the Charm and Chance kit from SVGcuts! She sent a picture text to her friends and was very happy. Phew. :)
Lots of "gold" but no Leprechaun...

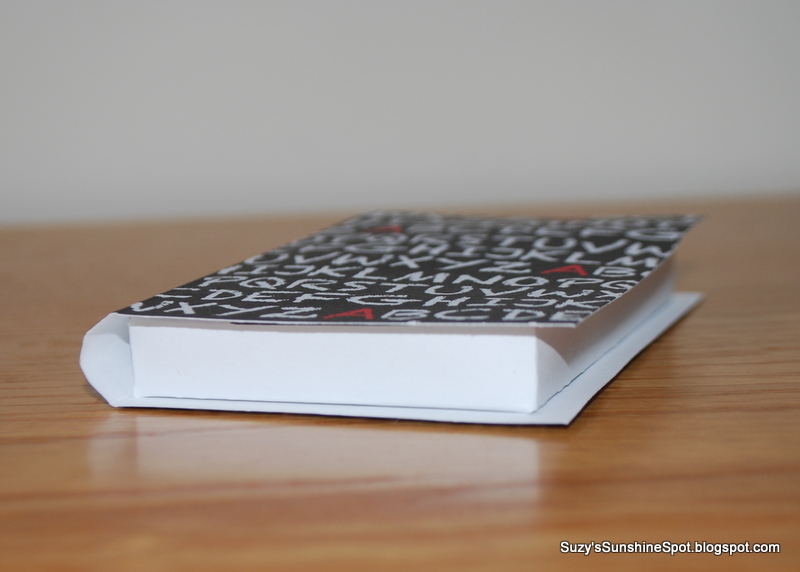
This shows how the top lifts off....but no Leprechaun.
Last but not least we parents were invited to a fun St. Patrick's Day party at a friend and neighbors house. The print and cut images from Lettering Delights.com dressed up my brownies just enough. I made enough to leave a piece for the girls with their own toppers which are now fun "paper dolls" Hope your St. Patrick's Day was a blast!
Yummy too!


Thanks for stopping by and adding your thoughts....

Blogaholic Designs”=