Showing posts with label gift card holder. Show all posts

Thursday, February 28, 2013

Quick Gift...not a card, but cash!

I like to have a few gift card boxes on hand since it is such an easy gift, and my girls always seem to have a party to go to...
 This really cute gift box is great for gift cards, and the slot raises the card and makes a nice presentation. But sometimes you want to give cash....
So, I was able to fold a 20$ bill into a cute origami dollar sign. I have a book that diagrams all these cute folds but it was Youtube to the rescue after all. There are so many ways to present money I can't wait to try it again! They make removable/temporary glue dots which worked great to secure this to the card I made so it will lift up as the box opens.

If you'd like to make this gift box, the file is available at MyTimeMadeEasy.com where they have some great packaging SVG files. I added a half circle cut out for a finger cut out but it is basically their file....The tag was a simple design I made using Make The Cut software and cut it all with the Zing (as usual)

Thanks for stopping by, have fun with your crafty endeavors....

Friday, November 9, 2012

Thanks Coach!

This cut file was from My Creative Time LLC...oops that's My Time Made Easy LLC!
they have some great files...check them out!
Both my daughters play field hockey, and my youngest just finished up a great season.....the made it to the first round of the finals, but lost in the semi finals after a 1-1 tie, and overtime, and two more 2 tie breakers. It was a real victory for a team made up of more than half newbies! They were all disappointed after getting so far in the Hockey Fest but they surely weren't disappointed in their coach. 

The girls were so lucky to have a great coach. She was able to motivate them to want to win without getting too carried away. She made the game fun and had all the girls eager to practice and learn. Amazingly she taught them so much of the great basic skills! At the end of the season, the families pooled our resources to present her with a gift card to her favorite restaurant. I of course was happy to make a holder for her since that's what I do!
The gift card pops up when the box is opened!!!


Monday, October 8, 2012

Cold stuff....

Of course I picked the coldest day yet of this fall to share this project with you...It's an old one I whipped up super quick for a birthday gift, in August.
 Cute Huh? It's an ice cream cone and a gift card holder! G's friend loves ice cream and chocolate in particular, so even though we didn't get her a gift certificate to the local ice cream place that we frequent, I did get her a cone. :) This is a file from SVGcuts.com and it goes together very easily. If you think you might have trouble, their website provides really good assembly videos. But the files themselves are always some of the best designs and easiest to cut and put together. They just work....
My "sprinkles"
Did you notice the cute sprinkles on top of the cone? And the shiny red cherry? I decided to break out one of my old supplies and used my Xyron to sticky both sides of the cherry so it would stick in place and so I could glitter the whole surface. It goes in once to coat the "back" then I send it through again to sticky the front while it's still on the paper. Then it super easy to coat with glitter....you end up with a glittery sticker. I used my Martha Stewart collection of fine glitter. SO pretty, I am sure you'll see more of it this fall and winter.

After the cherry I decided to use the little bits form my slot hole punch to make sprinkles. It's one of those simple one hand punches. And it was full of old scrap pieces I always forget to empty out, so I just tipped it into the Xyron and crossed my fingers. What came out was a bit gooey and clummpy but hey, don't sprinkles always look like that? ;) I was pretty happy with the outcome and ran out the door since of course I made this last minute.

Next I'll catch up one some fall stuff....promise. :)

Thursday, May 24, 2012

Teacher's Gifts- The end of the year...

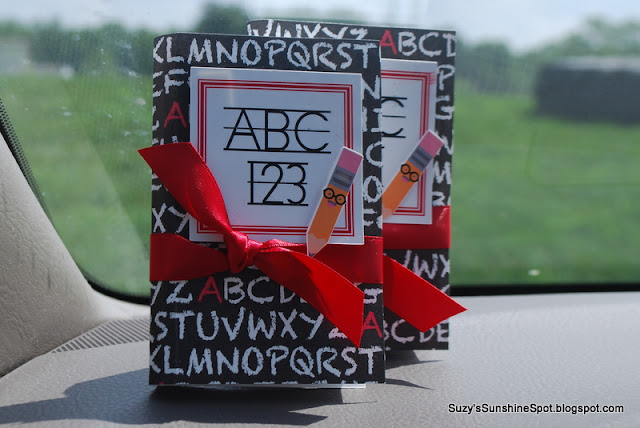
Yes,, I took this picture in my car right be fore school LOL
This year my youngest started preschool and I wanted to thank her first ever teachers for the great job they did. Conversations with my daughter didn't lead me to anything really good for them, so we settled on several gift cards. B couldn't decide. She wanted to give them a million dollars((lottery tickets) and also her favorite, pink donuts (Dunkin gift card). Plus she decided a dinner out would be great since donuts aren't healthy (Applebee's gift card) and also some good books to read (Barnes and Noble's gift card). Luckily it didn't add up to too much since I was able to get a multipack to slit up.

I was also happy to be able to make the simple 3D book gift card holder that is similar to the ones our committee made for the elementary school teacher appreciation week gifts. Those are shown in the previous post, and now I can include directions and possibly manage to attach the file for sharing too! :) I have to add that I was inspired to create this by the book files from SVGcuts.com and I do indeed own those files, But I wanted to create a file that was simple to make in mass quantities and sized for a gift card., so I created this file by putting together basic shapes.

For these gift card books I added some different decorations to the front. I hope they look like mini books...do they? My decorations on the front are a print and cut made with two Lettering Delights files. The font(LD Vertical trainer) wasn't looking good as it was imported into MTC directly so I started a word document and made the red outline box by creating a table of 1X1 and then changing the border. I placed the text into the "table" after I installed the font and simply typed in the text. Next I saved the file as a PDF right from Word and then imported it into MTC. I did have to change the color to red one imported but it looked great after that one simple step. The pencil is from the Pop School Graphics Set I believe. They have some great images!!! The last step before cutting was to created a shadow then do a simple print and cut. Look ho awesome the small pencil cut!!!  I used dimensional tape to layer the pieces and finished it off with ribbon. (of course)

So now, in great detail I'll show you how I put this box together.....

The outer "cover" is cut at 6.25 X 4.5 inches and scored at 2.75 and 3.5 inches for a 1/2 inch "spine"

It'll make sense when you have your own in hand...promise.
This is the piece included in the file. Simply fold at the score marks to make a start of the "box" that represents the pages. The half circles fold in to help close the whole book at the very end and there is a bottom and some side tabs. You'll need to glue a rectangle into this after folding it all into shape. The rectangle should be 5.5 X 4 inches and scored at2.5 and 3.0 inches.
Sorry for the bad pic. :(
After you fold all the pieces a the score lines, simply glue it together to form your inside box...
this is just the rectangle glued to the bottom tabs...see the the half circles that are sticking up here?
 You want this to fit exactly into the corners nice and snug!

This is what the bottom will look like.
 See the rectangle tabs sticking out? These need to be glued to the sides of the rectangle as you fold it into shape.
This is the box bottom an the top cover ready to go.
Place some strong adhesive along the edges of the bottom. Be sure to put adhesive very close to the edge on the side that goes up against the books "spine"

This is where it et's a bit tricky but only a little. You might have noticed that I left a "spine" of a half inch on the inside "box" and a "spine" of 3/4 inch on the outside cover. This is not an accident! The difference in sizes creates the rounded section common to real books. This is why you need to be careful in the next few steps.


Place the bottom of the "box" right up to the edge of the score mark representing the inside of the back of the cover. Press it down firmly and make sure it holds tight for the next step.


Place your adhesive for the top inside cover just inside of the tabs so that you leave space to tuck those tabs in later. Be sure side that will be up against the spine(on top here) has adhesive right at the edge.

Place the edge of the "box" up against the scored line on the cover so that the spine is formed with a rounded shape. I gently rounded the paper first by bending it around my finger before assembling mine. Press firmly so it stays in place.
The"tuck"

Fully assembled, but not decorated...
Tuck the tabs into the top cover once you have your gift cards inside and Viola! A 3D book that's a gift card holder!!

MTC file HERE
SVG file HERE and HERE for the pages...make sure the overall sizes are correct. The element that creates the pages should be 10" long. The dimensions are in the blog for the cover etc.

Friday, May 11, 2012

Teacher's Gifts~What I've been doing for the past few weeks!

Our gifts for the teachers and staff at the elementary school
Hello everyone, I have been busy creating some really fun stuff for Teacher's Appreciation Week. For four days, we provided a small mailbox treat for the teachers and staff, as well as a special gift for the bus drivers this year.

Our theme was "Caribbean", with each item loosely reflecting the colors and style. The luncheon we provided was jerk chicken, peas and rice, vanilla and lime cupcakes and mojitos mocktails. 

On the first day our treat was goldfish cracker wiht a tag that read "You're O-fishally the best!" . The colors were so fun together and the teachers enjoyed the little treat. The cute fish paper for the back of the tag came form the Echo Park Summer collection released last year. I designed the fish on the front using basic shapes in MTC to match. The text inside is done as a print and cut so all the text was super easy this year.

The second item was a "sour cream container" style treat box filled with Heshey's kisses. This is an awesome presentation because it is so simple. It's hardly original(just google it and see) but a huge hit. My favorite part is that you can make four form one page of 8.5X11 cardstock. This is awesome since we try to stay on a tight budget for the whole week. Staples had some really nice colors to match out theme. The background of the tag was also the EP Summer collection.

Four cards for everyone!
 Each year a big hit is a collection of cards. This year we were able to create four for each person to give out on the third day. Clear bags made a nice but simple presentation. Two of the cards used a print and cut sentiment in a circle using a cool trick of layering that I'll post more on soon. All of them are so bright and festive. I hope everyone likes them! I was so grateful for the talent of our team this year. Everyone was so fun it was hardly work. (Well they might have a different opinion but that's my story and I am sticking to it!)

I don't have a good picture of our mini books we made into gift card holders but I loved them. I'll try to include them in another post since I'll have an SVG file to share too! I think these were the trickiest to create but one of the other ladies discovered and easier way to assemble them so I'll share that as well. It's nice to craft with a group since there's always something to learn.

Finally I want to share out gift bag project for the bus drivers. The bags were made to hold a gift card on a tag in the pocket, and a bagel and spread with a water bottle inside.

One of the ladies came up with the idea to fit the tag in the paper as a pocket and it all fit together nicely!
The little heart and the heart charm part of the tag was created using basic shapes welded together. Then the large tag was created using a basic tag from a SVGcuts.com file set, then layering the gift card slits from the same set. The sentiment was a print and cut onto an inset shadow layer. This was all done using the MTC software. The gift card fit nice and snug on the back since we layered the sentiment with dimensional tape.

Most of the gifts this year went together easily except for the gift card boxes that look like mini books. LOL There's always one project each year that is a pain. I am so lucky to be a part of the group that creates all these things every year. The whole group also distributes the treats each day, then provides a luncheon for the teachers and cleans everything up! For the last day our parents are asked to bring in an entire dessert for the teachers to enjoy at home.  It's a lot of work for everyone but we all think our teachers are worth it!!

More to come....I made some little gifts for my daughter to take in each day as well!!!

Thanks for stopping by and adding your thoughts....

Blogaholic Designs”=