Thursday, May 24, 2012

Teacher's Gifts- The end of the year...

Yes,, I took this picture in my car right be fore school LOL
This year my youngest started preschool and I wanted to thank her first ever teachers for the great job they did. Conversations with my daughter didn't lead me to anything really good for them, so we settled on several gift cards. B couldn't decide. She wanted to give them a million dollars((lottery tickets) and also her favorite, pink donuts (Dunkin gift card). Plus she decided a dinner out would be great since donuts aren't healthy (Applebee's gift card) and also some good books to read (Barnes and Noble's gift card). Luckily it didn't add up to too much since I was able to get a multipack to slit up.

I was also happy to be able to make the simple 3D book gift card holder that is similar to the ones our committee made for the elementary school teacher appreciation week gifts. Those are shown in the previous post, and now I can include directions and possibly manage to attach the file for sharing too! :) I have to add that I was inspired to create this by the book files from SVGcuts.com and I do indeed own those files, But I wanted to create a file that was simple to make in mass quantities and sized for a gift card., so I created this file by putting together basic shapes.

For these gift card books I added some different decorations to the front. I hope they look like mini books...do they? My decorations on the front are a print and cut made with two Lettering Delights files. The font(LD Vertical trainer) wasn't looking good as it was imported into MTC directly so I started a word document and made the red outline box by creating a table of 1X1 and then changing the border. I placed the text into the "table" after I installed the font and simply typed in the text. Next I saved the file as a PDF right from Word and then imported it into MTC. I did have to change the color to red one imported but it looked great after that one simple step. The pencil is from the Pop School Graphics Set I believe. They have some great images!!! The last step before cutting was to created a shadow then do a simple print and cut. Look ho awesome the small pencil cut!!!  I used dimensional tape to layer the pieces and finished it off with ribbon. (of course)

So now, in great detail I'll show you how I put this box together.....

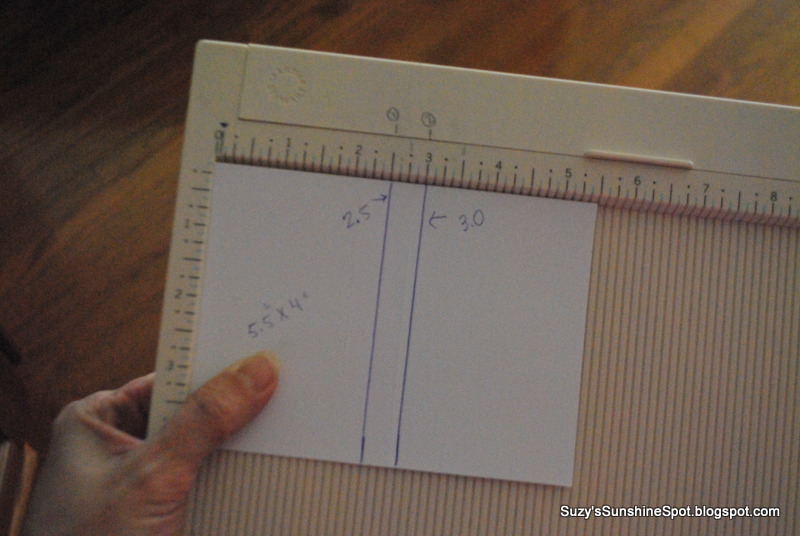
The outer "cover" is cut at 6.25 X 4.5 inches and scored at 2.75 and 3.5 inches for a 1/2 inch "spine"

It'll make sense when you have your own in hand...promise.
This is the piece included in the file. Simply fold at the score marks to make a start of the "box" that represents the pages. The half circles fold in to help close the whole book at the very end and there is a bottom and some side tabs. You'll need to glue a rectangle into this after folding it all into shape. The rectangle should be 5.5 X 4 inches and scored at2.5 and 3.0 inches.
Sorry for the bad pic. :(
After you fold all the pieces a the score lines, simply glue it together to form your inside box...
this is just the rectangle glued to the bottom tabs...see the the half circles that are sticking up here?
 You want this to fit exactly into the corners nice and snug!

This is what the bottom will look like.
 See the rectangle tabs sticking out? These need to be glued to the sides of the rectangle as you fold it into shape.
This is the box bottom an the top cover ready to go.
Place some strong adhesive along the edges of the bottom. Be sure to put adhesive very close to the edge on the side that goes up against the books "spine"

This is where it et's a bit tricky but only a little. You might have noticed that I left a "spine" of a half inch on the inside "box" and a "spine" of 3/4 inch on the outside cover. This is not an accident! The difference in sizes creates the rounded section common to real books. This is why you need to be careful in the next few steps.


Place the bottom of the "box" right up to the edge of the score mark representing the inside of the back of the cover. Press it down firmly and make sure it holds tight for the next step.


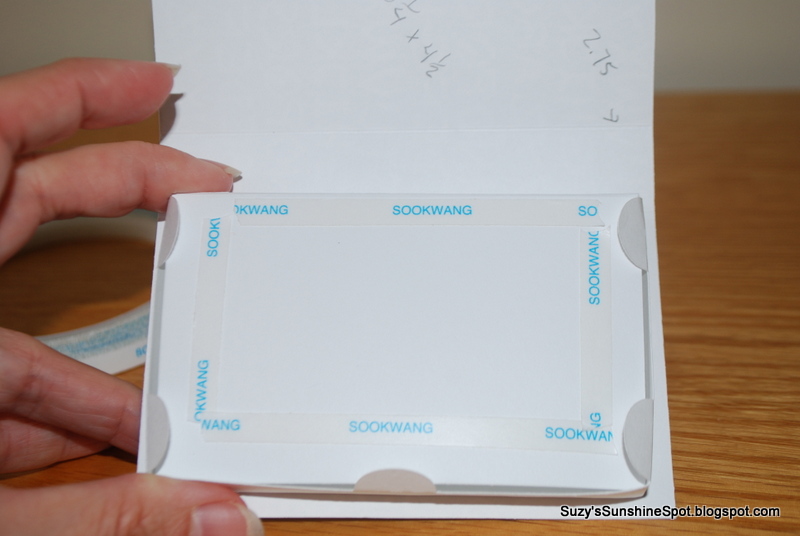
Place your adhesive for the top inside cover just inside of the tabs so that you leave space to tuck those tabs in later. Be sure side that will be up against the spine(on top here) has adhesive right at the edge.

Place the edge of the "box" up against the scored line on the cover so that the spine is formed with a rounded shape. I gently rounded the paper first by bending it around my finger before assembling mine. Press firmly so it stays in place.
The"tuck"

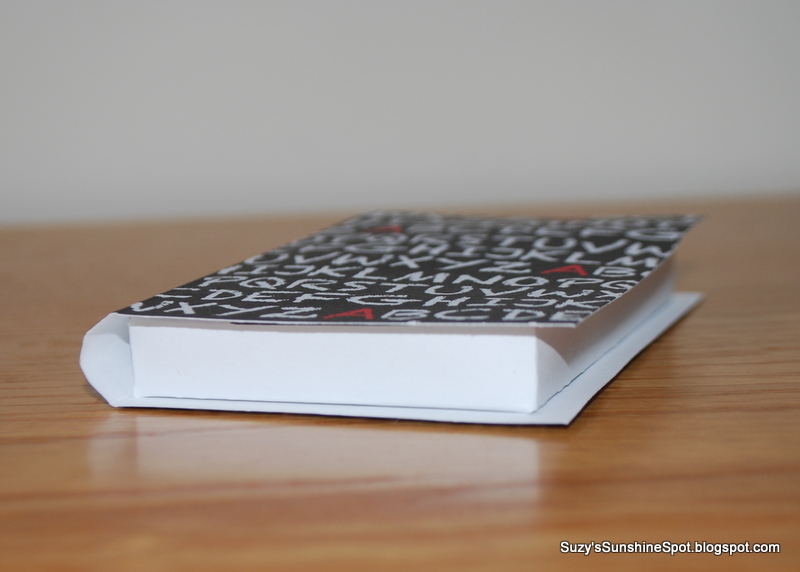
Fully assembled, but not decorated...
Tuck the tabs into the top cover once you have your gift cards inside and Viola! A 3D book that's a gift card holder!!

MTC file HERE
SVG file HERE and HERE for the pages...make sure the overall sizes are correct. The element that creates the pages should be 10" long. The dimensions are in the blog for the cover etc.

Friday, May 11, 2012

Teacher's Gifts~What I've been doing for the past few weeks!

Our gifts for the teachers and staff at the elementary school
Hello everyone, I have been busy creating some really fun stuff for Teacher's Appreciation Week. For four days, we provided a small mailbox treat for the teachers and staff, as well as a special gift for the bus drivers this year.

Our theme was "Caribbean", with each item loosely reflecting the colors and style. The luncheon we provided was jerk chicken, peas and rice, vanilla and lime cupcakes and mojitos mocktails. 

On the first day our treat was goldfish cracker wiht a tag that read "You're O-fishally the best!" . The colors were so fun together and the teachers enjoyed the little treat. The cute fish paper for the back of the tag came form the Echo Park Summer collection released last year. I designed the fish on the front using basic shapes in MTC to match. The text inside is done as a print and cut so all the text was super easy this year.

The second item was a "sour cream container" style treat box filled with Heshey's kisses. This is an awesome presentation because it is so simple. It's hardly original(just google it and see) but a huge hit. My favorite part is that you can make four form one page of 8.5X11 cardstock. This is awesome since we try to stay on a tight budget for the whole week. Staples had some really nice colors to match out theme. The background of the tag was also the EP Summer collection.

Four cards for everyone!
 Each year a big hit is a collection of cards. This year we were able to create four for each person to give out on the third day. Clear bags made a nice but simple presentation. Two of the cards used a print and cut sentiment in a circle using a cool trick of layering that I'll post more on soon. All of them are so bright and festive. I hope everyone likes them! I was so grateful for the talent of our team this year. Everyone was so fun it was hardly work. (Well they might have a different opinion but that's my story and I am sticking to it!)

I don't have a good picture of our mini books we made into gift card holders but I loved them. I'll try to include them in another post since I'll have an SVG file to share too! I think these were the trickiest to create but one of the other ladies discovered and easier way to assemble them so I'll share that as well. It's nice to craft with a group since there's always something to learn.

Finally I want to share out gift bag project for the bus drivers. The bags were made to hold a gift card on a tag in the pocket, and a bagel and spread with a water bottle inside.

One of the ladies came up with the idea to fit the tag in the paper as a pocket and it all fit together nicely!
The little heart and the heart charm part of the tag was created using basic shapes welded together. Then the large tag was created using a basic tag from a SVGcuts.com file set, then layering the gift card slits from the same set. The sentiment was a print and cut onto an inset shadow layer. This was all done using the MTC software. The gift card fit nice and snug on the back since we layered the sentiment with dimensional tape.

Most of the gifts this year went together easily except for the gift card boxes that look like mini books. LOL There's always one project each year that is a pain. I am so lucky to be a part of the group that creates all these things every year. The whole group also distributes the treats each day, then provides a luncheon for the teachers and cleans everything up! For the last day our parents are asked to bring in an entire dessert for the teachers to enjoy at home.  It's a lot of work for everyone but we all think our teachers are worth it!!

More to come....I made some little gifts for my daughter to take in each day as well!!!

Monday, April 30, 2012

MichelleMyBelle'sCreations: Blog Award

Hello everyone! I wanted to accept a blog award since it touches on an idea I have had rolling around in the back of my mind. Although I love my  "blog celebrities", the commercialization of blogs has discouraged me just a little bit. The concept began as we regular people sharing our ideas and having fun reaching out to each other so I love the spirit of this award. I am having fun sharing with my followers and random passers-by so here I go:


Blog Award


First of all I would like to thank Michelle who's blog is not to be missed. She is part of a Design team which means she features great products and has some really unique ideas on top of flawless execution...check her out at Michelle My Belle's Creations. Recently I even snagged some cool templates and even cut files there! WooHoo!


Now down to the details:
The idea of the award is to draw attention to blogs with less than 200 followers and  pass the award on to 5 other bloggers all in the spirit of fostering new connections.

 The rules for the award are :-

1. Show your appreciation to the person who gave it to by
    thanking them and linking back to their blog.
2. Post the award to your blog.
3. Give the award to 5 bloggers (with less than 200
    followers) that you appreciate and follow.
4. Leave a comment to the 5 bloggers to let them know you
    have chosen  them for the award.

'Liebster' in German means 'dearest', so to carry this tradition on here are the blogs that I'd like to pass the award on

to :-

Ad now, in no particular order. ;) I'd like to give this award to:

Lysa of Lysa and Huey Ink -She's spicy and down to earth, love it and she has some really amazing projects going on with some tips to share.

 Paige of She Who Must Stamp - She has beautifully stamped cards and her blog is a great place for inspiration.

Dana of Creative Reflections -She's got a very inspiring story as well as some great projects, including those SVGs and files for MTC. So lucky to stumble on her blog!

Gigi at Cutting and Scrapping -You might notice she's a dear friend o mine. Separated by miles, I love when she blogs so I can try to learn form her amazing talent.

Megan at The Flick Four- Another friend who is soooo inspiring with her beautiful photography, and on top of that her wonderful artistic eye that she turns on every aspect of life...


Thanks again so much again Michelle for giving me an opportunity to share some of my favorites...

Suzy

Monday, April 9, 2012

Easter Crafts-window stickers, vinyl eggs


My favorite one is the yellow flower on the teal egg. Got bold LOL.

 Hi everyone. Hope you all had a wonderful Easter Day! There are a couple things I wanted to share even if it's late and I technically have some other posts I should do first.

The first is this years Eater eggs.I love making them using vinyl as a resist to the dye. I have a few recommendations however.

First, boil your eggs at least a day ahead to ensure they are very dry. The eggs we boiled the morning before coloring them did not seem dry enough even though they were done and in the fridge for at least five hours. They were dry to the touch but somehow had enough moisture in them to make the vinyl peel off a bit.

Also be sure to keep your images small...the egg's shape makes it difficult to apply evenly sometimes.

Finally the vinyl sticks best when the egg is a bit warmer, I use my hand to warm the vinyl a bit and really press it on well. Sealing the edges if possible.

 My next project is print and cut with window decals!

Somehow I couldn't find any window clings this year for my 4 year old to put up. So, I decided to try something I had stashed away...some clear window decals I picked up at Office Depot.

These printed and cut nicely with MTC and my Zing


These aren't as pliable as the static cling ones I have purchased but it is so fun to think that all the designs I use to decorate my home can be from the same collection. 

for these I used my MTC software to layer images from Nancy Kubo's Lettering Delights digital collection and added their shadows. Then used the print and cut feature. The sticker and it's backing adhered well to the mat and I had no problem cutting them with my Zing. I did learn a few valuable lessons. I will definitely adjust the settings on the printer next time so they come out darker. The shadow needs to be set to color=white and then placed in a layer underneath the image you want printed. You cant see the image when it has a white shadow layer on top..LOL. It took me a bit to figure what I was doing wrong, even after I had some great pointers from members of the MTC message board!

Once again I hope you had a wonderful holiday!

Sunday, April 8, 2012

Happy Easter!

 My littlest is all about the Holidays so I had the girls make some eggs and created some simple shapes for the sides. These are all held in place by the cutest clothes pins. Next I'll be putting up my Spring banner so it's easy to change up!

We love any reason to celebrate at our home, but especially Easter, and I sincerely wish each of my readers a Blessed Easter!

Monday, March 19, 2012

Leprechaun Traps


Thanks to my B who lives from holiday to holiday, this year we celebrated St.Patrick's Day to unprecedented levels! The girls were super excited to set up Leprechaun traps for the very first time. We read stories and did some research to find out: they are very tricky, love green, sweets, and golden coins. This was the perfect opportunity to make something fun! 

I first thought of a hat found in the Made in the USA kit by SVGcuts.com. It was an Uncle Sam's hat and before I had to struggle with mine, I saw Katie Wegner had made super beautiful leprechaun hat with it already, so I knew it would work. Her hat was fabulously decorated and you can see it at KtsAngels.blogspot.com. Ours were a bit more plain but it has a twist. A booby trap!

I also remembered a black pot from Party on Elm Street SVG kit. It's a Halloween set, also from SVGcuts.com. I was wanting to make this since it debuted and Mary from SVGcuts.com mentioned making a pot of gold right in the tutorial video. It was really sturdy and easier than I thought. Very lucky for us, since these are a big hit with the kids!

 For the black kettle I will mention some details that make it easier for everyone, especially MTC/Zing users. First of all when I imported the file I was sorta "stuck on stupid" and made some huge mistakes on sizing. I am not sure what happened since it was all a mess, so I highly suggest looking at the instruction PDF that comes with the set before you start. LOL 

Next, since I didn't like how deep the scoring cuts can be on some of the files. I worked out a way to keep the cuts from going all the way through. Here's my fix: First I use the edit/shape magic/break function and break apart any pieces that have scoring. After sending the outline of the shape to a new layer (down on the lower right use the "selection to new layer"which looks like a mini mat with a plus sign). Then select all the score marks and use edit/shape magic/join to group them all together. I leave the score marks and the outline on a separate layers and then when I make the first cut, hide the score marks only and use WYSIWYG mode. This way only the outline is cut. 

Then, without removing the mat, I hide the outline and un-hide the score mark layer (open and closing the eye in the layers box). When I go to cut the score marks, since I use WYSIWYG, I clicked the "use last" button for setting the origin and lower the pressure. This way, I get cuts that don't make it a the way through the paper to the back. 

On a side note, there is a sizzix eclipse feature that does this as well and I don't have a clue how it works but apparently there is a tutorial on the SVGcuts.com blog. I imagine there is also a way to work around this issue for other machine as well.

OK so in order to make the traps I made a few changes to the basic designs.  I had many wrong size tabs left over that fit nicely when trimmed, so I used those to attach the "false top" to the trap. I very conveniently also had a wrong sized bottom so this became my "false top." How lucky for me? LOL One tab attached the top to the side of the pot and the other lightly held it up. The girls wanted to put cupcakes on top, then suggested real gold but they settled for pennies luckily.
One tab was to attach it to the side.
The other tab attached to the inside of the pot to keep the "false top" in place.
Here it looks like a solid "Pot o' Gold" Hee Hee
For the Leprechaun hat I created a similar false top by cutting a new oval inside. I used edit/shape magic/shadow and when the box popped up I selected "inset shadow" and sized it using the slider bar, making sure the points of the side pieces would fit withing the ring, by eyeballing it. But I had my thinking cap on by then luckily and it worked out well. It was easier to glue the ring to the side than it usually is to glue a solid piece so I might consider this fact when I make other 3D items.

I used the same concept to attach the false top to the inside of the Leprechaun hat...The tab to hold the "false top" in place was too long in the picture below so it was trimmed to just enough to lightly hold the top up. The other tab needed to be long since it needed to be put in place after the ring was glued so it extended all the way to the side of the hat.

There was much discussion about how the Leprechaun would get onto the tall trap, how tall Leprechauns were, and how heavy and how much "gold" we needed to attract him. Also why they were all boys and if they had parents, but I sorta glossed over that part. ;)

Here's some construction pics:
See how nicely this fits together?

This shows how one piece attached to the top hat and the other was a tab to hold the top in place.
She made a very careful study of how many pennies to place on top before it was too heavy.
Un fortunately for us, the Leprechauns escaped our carefully designed traps. But, they left behind plastic and chocolate "gold coins" and chocolate gold and silver "bars"(Hersheys Nuggets). The girls allo found one gold dollar coin in each trap!
The next day the Leprechane had gotten out.
He got away and must have been in a hurry since he knocked the ladder down!


I made this bag for my teenager so she wouldn't be left out. This was from the Charm and Chance kit from SVGcuts! She sent a picture text to her friends and was very happy. Phew. :)
Lots of "gold" but no Leprechaun...

This shows how the top lifts off....but no Leprechaun.
Last but not least we parents were invited to a fun St. Patrick's Day party at a friend and neighbors house. The print and cut images from Lettering Delights.com dressed up my brownies just enough. I made enough to leave a piece for the girls with their own toppers which are now fun "paper dolls" Hope your St. Patrick's Day was a blast!
Yummy too!


Monday, March 12, 2012

St.Patrick's Day Banner

Oh so cute right?
The full banner....trying to keep things simple and easy so it stays fun and gets done! "fun and done"
 So, how cute are these two Leprechauns? My little B had fun playing with them for a bit before they ended up on the banner today and I have big plans for them.  They come with a few fun images in the Lettering Delights set called "Luck of the Irish"

For some reason my girls are SO into any holiday (wonder why). Even St Patrick's Day must be made into a big event. This year, for the first time, we will be making Leprechaun traps. These guys are going to end up in the traps in the morning as if  Leprechauns who visited us have attempted to fool us. Of course they will leave behind some chocolate "gold" and hopefully it will be an exciting morning!
These guys have tons of layers! I added some extra dimension using dimensional tape as well.
I waited until the banner was up to place them for best effect.


This is a centerpiece. Isn't the rainbow fabulous? I hope to get a better shot and show how nicely it layers.
This one is on the right. :)

Wednesday, February 29, 2012

Our Valentines Day

 I love to surprise my girls with some treats for Valentines Day. Mostly a few candies but this year I found some Target dollar section goodies they would love. One thing I loved is all the cute SVG files I found at Lettering Delights. To be honest I had lots of options with some stuff from SVGcuts.com as well but settled on these "conversation heart boxes" and some graphics files for a super quick card for two of my girls. My littlest has found a cute movie from Netflix called Disco worm so when I saw the worm card form on the Lettering Delights store I knew I had to make it. My oldest has a thing, against pirates so I had to get the Valentines set and then my G loves her ipod touch and music so it was lucky that I had the  file too. I used the print and cut feature and made super quick Valentines. After spending a lot of time on the projects below....
 I made about 40 of these Conversation Heart lollipop covers. I used the basic set to create my own file but somehow I am not sure it was enough bang for the buck. I print and cut a sentiment on the back so that the girls could just sign them and hand them out...they usually do more to help but since this was a late night project.
My littlest one had her first ever Valentines Day party at preschool so we went all out with these treat boxes. Yes they are mini bug boxes! How cute is that? The file and kit are at..wait for it...Lettering Delights. B saw these cute bugs and decided against the kitty cat Valentines we originally planned, the ones I liked from the SVGcuts.com site....but this wasn't a very difficult project and I didn't mind the switch. The front sentiment was a print and cut, and I printed a sentiment on the back for B to sign. We found some really cute conversation heart candies to put in the back. It makes the girls feel so good to give out something a bit more fun.

Wednesday, February 1, 2012

January Challenge Layouts

Not sure how everyone else stays motivated, but for me a challenge really sparks my energy and creates excitement for a project. A friend of mine in California has issued a challenge for one of my online groups...a layout a month with two sketches to choose from. I've been feeling distracted with other paper crafting projects and very behind in my scrapbooks. So, since she was so generous to offer to select and post a set of sketches, I just had to try! And if I put January on my blog everyone will hold me accountable for each month now right ;)
This was the original we worked from
This was a seriously simple layout since my focus was on DONE.... My goal for my daughters is to have albums that capture their lives for them. I do love to create beautiful artwork but frankly some times you just have to get it down on paper. I am pretty sure that this took me less than 45 mins total. I kow, you can tell, LOL. But it literally fit into scraps of time here and there! I was so grateful to my friend for posting that challenge and encouraging us to get back to where we started. I'd also like to thank the artists who posted the sketches originally for generously sharing their efforts with us.


This is the original for the double page layout
                           
So, for the second part of the challenge I wasn't sure if  I'd be done in time. Unfortunately it was a sick little one at home that gave me more quiet time than usual. I decided to try this double page and just made the deadline. The final bits of this LO went on just as my girls were heading up for bed and it took me more time to put the pieces together than to plan out. There are plenty of things I would change for on this one but again, my focus was on done. Also, my photo doesn't do these wonderful papers justice(Dreamin from Close to My Heart) since it was taken at midnight and you may know about my lighting issues. ;)

Thanks for stopping by....

Thanks for stopping by and adding your thoughts....

Blogaholic Designs”=