Saturday, July 30, 2011

Art Philosophy!

Some quick projects
So, as you know scissors and I just don't get along. Shocking for a paper crafter I know! But I have never had much success with cutting stamped images so nice and neat even thought I love the look. So here comes Close To My Heart to the rescue...with an new Cricut Cartridge called "Art Philosophy". It is a cartridge set which coordinates with the stamp sets and chipboard shapes included as many of you know but I wanted to include some FAQ's and projects below. Enjoy!

*Edited to add a video and some info on CTMH's new offers for August!


August "Stamp of the Month"

What do I get when I order the Philosophy set?
The set comes with: 1 Cartridge with 700 images which includes: 50 images with layers, 50 basic shapes with layers, 50 combination images, 50 labels, 50 tags, 2 full fonts(that can be layered), 13 – 3D images(six flowers, various boxes and other shapes) and 17 borders and several accents! Also 3- 9X12 sheets of chipboard dimensional elements that coordinate with the cartridge and the stamps. The dimensional elements are available separately through the catalog as well.
In addition, according to the “Constant Campaign” program through Close To My Heart corporate office, you will be eligible for several special promotions through the year. August is an amazing Stamp of the month offer which includes two sets of stamps…more throughout the year.

Will I be able to purchase “refills” of the chipboard?
Yes, these shapes are available to everyone through the catalog as a “dimensional element” and can be used even without the Cricut or the stamps. Each sheet of chipboard shapes is only $3.25!

Will it be available through Cricut Craft Room?
Yes, judging from the booklet, there are plans to add it to the program now in BETA mode.

Does it work with all the Cricut machines?
Yes but you must do and update for the Imagine first and possibly the E2. It works fro the expression right out of the box!

How many stamps coordinate?
At my count, there were approximately  44 coordinating stamps available in the catalog besides the ones included in the 3 sets that come with the cartridge.…some others stamps will fit also that are simply different sizes or able to fit within a simple shape like a circle or oval.

How do I know how big to make the cuts?
The stamp that has a coordinating image has a small outline printed around it on the clear sheet. Then next to it, the size is printed out…There are also images that complement the stamp and shape and make it a really versatile cartridge.

Do I get Cricut Rewards?
Yes, a certificate for 90 points is included with the cartridge/ You must have a cricut rewards account to redeem it at www.cricutrewards.com .

Ok so here are some projects:
 These cute pillow boxes fit a gift card perfectly when cut at 5"! The coordinating stamped images have the sizes listed right next to the stamp on the acrylic sheet, so it was easy to create these.

Notice the "to and from"? Cute for tags huh? And they all come with the cartridge. The paper used is the "elemental" collection that is available starting August 1st.
My DD had to make a felt flower for her purse. Cut at 4.5 inches
 The Font! This is cut at 3" so you could see the detail. The top layer detailed letter might need to be cut at least 1.5"


Some of the fun flowers.

The "rose" cut at 3" and smashed a bit more.
 
The cuts as a group...
 I wanted to show how nice and neat all these cuts fit onto a half sheet of paper. All these are cut to the indicated size and just using "load last" in between cuts.
This was my very fist flower...ever!
 This gives a good perspective on how big you might want to cut your flowers. I just guessed and got lucky.
Felt flowers. Cut at 4.5 with some heat n bond for stiffness

This shows the difference in thickness between a 3 and 4.5 inch flower...

A second look and a perspective on the flowers sizes.

Wednesday, July 13, 2011

An art-full trip to the beach....project boxes for the car.

In order to entertain my savages during the long car ride down to the beach this summer I was looking for some art projects. The Crayola color wonder sets coe with a cute little lap desk and some storage but it just didn't seem like enough space. Plus my oldest had moved onto "fine art" supplies....in order to replicate "My Little Pony" images for her sister I have to add.

The gears were turning in my brain and I recalled earlier seeing "project boxes" from the office supply store. Those places are number two after a craft store truly! I had no excuse to buy them the first time around but I knew that my other favorite all time products, command strips, made a special clip that secures papers. Bingo! I had project boxes!

I had lots of vinyl to decorate them for each girl and they each fit quiet a large stack of papers as well as pens and markers and whatever else you might want. Mine were simple ones with no dividers, and only about and inch and a half deep. They were plenty big to clip papers and small notebook to though.

Vinyl cut with the Give a Hoot cartridge and my Expression
A fancy one for G Cut from the Martha Stewart Cake cartridge.
Once Upon a Princess Cartridge for B, the Princess...with a cute frog

 These pieces were simple designs that layered well. I vetoed the other choices that weren't ;)
The command strips secure right to the front of the case...


To make sure each clip was in the right place I made a stack of papers, put on the clips them put them onto the case. When I had it lined up the way I wanted it, I simply peeled off the backing strip and pressed it down firmly. I also prepared the surface by wiping with rubbing alcohol to be sure they would stick tight.


 An initial went on the front so that it wouldn't get in the way of their drawing or coloring like the design might.


*Note: This is a rewrite of my original post which got accidentally deleted. :( Sorry to say this isn't as good a tale as the original but I still wanted to share this with my readers.

Tuesday, June 21, 2011

Big Foot is real!

And I have proof...

My DH loves to joke about aliens and Sasquatch...I am not entirely sure what he believes, but when I saw the "Big Foot" on the Campin Critters cartridge, it was a must have (even without the 3-D backpack). I was so happy to make this with a great bit of direction from my girls...of course it was nice to have a challenge sketch from the CIrcle Blog and a contest. ;)

The circle is sprayed with some glittery gold smooch from Stampin-up. I can't believe I waited so long to use it. The over spray looked amazing on the black scrap paper and it has the wheels in my head turning! Next the sign was created from the same cartridge with the bottom edge of the saying trimmed off. The top portion was stamped with a "wood grain" background stamp from Close To My Heart. The bottom portion of the sign is the Designers Calender cut for "Dad's Day". Up on tiny tiny bits of dimensional tape! Phew, that was tricky but I love the tape from CTMH in a roll so you can use the exact size needed.  A wonderful friend sent me some bakers twine and some buttons finished it off. Once the colors were decided, it was a pretty quick card all in all.

Thanks for dropping in. :)

A "Fancy" Party


 My middle daughter was looking for a special theme for her first ever slumber party. So after looking through some cake ideas and themes she decided she wanted a "Fancy Party" Including a fancy cake decorations and a "fashion show" 


SO, I got out my trust Cricut cake and cut some "fancy decorations out of black fondant and created a basic cake inspired by one right in the cartridge booklet. We used a ton of pink ribbon and I created a monogram for her right on the cake.


The party favor bags were simple white bags that I bought in bulk and just decorated with paper similar to what was used on the invitations and the banner. I replaced the original ties with some of the same ribbon used throughout to make everything coordinate. Inside were the goodies they collected and some other little treats. I included some very fancy cookies with a simple rectangle of paper folded over and then with a rectangle of the patterned paper again. It looked simple and elegant with a pink bow on top.
Some "fancy cookies" with a simple bag topper

Her banner was created using cuts form the Martha Stewart Elegant cakes cartridge for the lettering and a shape from  Elegant Edges Cricut cartridge I believe. I made the rosettes by hand and layered with more of the patterned paper here.


The girls played a fun game of scavenger hunt which I created using the same graphics digital patterns from the invitations (Echo Parks Yours Truly) and a super cool software I found called Riddle Me. You can customize the search and all the clues in just a few minutes and then print it al out in a coordinating set of cards! How cool is that. You can find it HERE.

 The girls ended up finding a treasure bin full of play necklaces rings fun hair extensions and braids and some other fun "fashionable accessories" They had fun putting things together for a runway show and took several turns coming down the steps and posing for their photo-op!

Fancy  food, cake and a movie rounded out the evening!
The birthday girl with her cake! How fun is the high heel cake knife? Loved this gift from my friend! Thanks J!

 *Note:This is a rewrite of my original post which got accidentally deleted. :( Sorry to say this isn't as good a tale as the original but I still wanted to share this with my readers.

Tuesday, June 14, 2011

Memory Book for a great teacher!

Not a great picture. :(
 This year is a very sad end to the school year. My G who is in second grade, is not just moving onto third grade, but also changing to a new teacher after two years in the same classroom. No, she didn't repeat, but the teacher did! She "looped" with her class when they all made a change to the next grade which meant she taught my daughter for two of her most important years,  first and second grade. Mrs. Daniels has been so amazing in dealing with all the personalities of the kids and I can tell she has a teachers heart through and through. She truly loves to teach and loves all her students. I love her too!

As a result I wanted to be sure her kids all got a chance to let her know how loved she is. I went into the school and Mrs. Daniels kindly arranged her schedule so I could "secretly" take photos of the kids and give them these sheets for to add their own thoughts.

The pages were printed onto cardstock after I used a graphic set and from Lettering Delights and put in some text and lines using Photoshop. Be sure to offset the image so you can leave space for binding BTW.

With a bit of prompting they came up with some really cute things to add to the book. After these were filled in I put it all together with a fun cover and presented it to her with some flowers and such at an end of the year picnic. I was so choked up and sad and she gave me a hug. :(

The kids filled these all in with their own thoughts....
 In addition to these pages I included some photos of some special events and some additional blank sheets of her own. The covers were chipboard covered with cardstock and bound using my "Bind it All" from Zutter. Love that thing!!

The front cover was decorated using my Cricut Expression and the Car Decals and Wrap it up cartridges. Of course I was in such a hurry I didn't get a good pic but a ribbon around the middle and it was a simple gift.


 *Note: This is a rewrite of my original post which got accidentally deleted. It won't be as good a tale as the original but I still wanted to share this with my readers. Thanks for stopping by!

Birthday, Birthday, Birthday, Birthday!

This is an EchoPark Hybid elements pack and papers...no cicut believe it or not! :)

This is all PNG files from the Something Fishy image set at Lettering Delights.
It's Birthday Season at our house! Worthy of the capital letters, and crazy making, we have four birthdays in a row starting in June and going into July. So I have dabbled in some photshop and shopped at JessicaSprague.com and LetteringDelights.com for digital downloads, to come up with two invites for my girls...No Cricut believe it or not!!! Lot's of Cricut cuts coming up next though so stay tuned.

The first invitation is "fancy" for my G's fashion sleepover party. I printed out the black damask, the pink print and the sentiment all using Photoshop. Here's where I admit that I am basically using it as a glorified "word" document and printing it out. I did use a digital image and erase the insides to insert my own information. You can see it peeking out from the edge....I was very proud of myself even though the next time it should take muuuuch less time! ;) the sentiment is simply punched out with two Stampin up punches and put over a "pleated" ribbon...

My other invite was complete with lettering on top with my daughters name and for this invitation I was able to play with layers in order to keep some elements on top. There is also a coordinating Alphabet I used or the inside as well as a salutation on top. Lettering Delights makes it so easy to use from an online library or by using your own computer files. I am glad this whole process will be getting much easier and faster since I hope to do some digital and hybrid scrapping too!

Thanks for dropping by!

Friday, June 10, 2011

Better Together


As part of another Challenge for the Cricut Circle Blog, we were tasked to create something using inspiration from the Magazine. It was full of amazing projects which made it tough to decide which one inspired me the most, but this project found me....My oldest just turned 13 and wanted a address/memory book for the last few days of school. I loved this projects since it was simple and yet gave me an opportunity to create something together with my daughter...precious times now that she is officially a teen! 

Crafting is even better together and I used the Imagine "Better Together" cartridge for this entire project. The cover was created with scraps (from another album for my younger daughter's teacher which I will add next week). It was a 4X8 scrap so it was easy to use one of the pre-programmed shapes on the Imagine. I used the rectangle with the aspect ratio of 1:2, and then flood fill it with the pattern I wanted. It was a perfect fit.

In order to use the internal shapes, simply navigate from the start up menu by selecting the "print and cut icon" in the upper left, then look on the very lower left corner of the screen...you'll see three icons in a row which represent the standard cartridge, then in the center the internal shapes, and next the imagine cartridge. Selecting the center icon will show a selection of shapes that you can cut or print and cut....if you want to fill it with a pattern, select to edit it then scroll through the patterns of any Imagine cartridge inserted. Or you can just cut it without printing.

I cheated and used my Epson printer to create some fake notebook paper and just trimmed it to fit within the book.  Then, it was ready to embellish.

After filling a 12X12 sheet and then another half sheet full of images with the Beta program of Cricut Craft Room, I printed and cut. Then, my daughter and I simply embellished the inside page by page. Some glue and a few punches with my Cropadile III- big bite, and some binding rings finished it all off...but then of course it needed just a bit of ribbon! :)

If you have an Imagine, you'll love the Cricut Craft Room software when it's released! One thing it can do is break apart an image and then reassemble it for you before you cut! I wanted everything flat since it was going in and out of  my daughters backpack all day, and the CCR was just the thing to make a few edits!
A Whole mat full of cuts from my Imagine!
As you can see on the lower right I have an image from "Better Together" which normally has a spoon and some wording. Instead, after dragging it to the mat, it was easy to select the "edit group" icon that appears with the image. After this, the other images become faded and you only work with the selected image. At the top right you can select to toggle between combine and separate. This comes in handy if you only want a portion of the image (like I did with the red phone)...or even if you'd like to make a change to a layer.

Layers can be deleted and even changed by flood filling a portion. You can select the different elements of the image and either delete or change them. Then after you make any changes you can re-assemble the image by selecting combine. The new image will remain with the changes made.

The final important step is to select "exit" which is at the top left in green so you can move on to editing and adding things to the entire mat....If my flip ever decides to let me download my videos I'd very gladly demonstrate. I can't wait to see if I can change a dress on a figure or something I've wanted to do in the past...looks likely and I am very impressed with the new software, even though it is in Beta mode. It is very promising!!

Thanks for visiting!

Monday, May 30, 2011

Simple Gifts


This layout was completed for a challenge which was a tic-tac-toe format. My three in a row was "use a cut of a sun shape", "use paper ribbon or something else to create a ruffle", and "any patterned paper must be printed from the imagine". Ribbon might just be one of my favorites and the pattern from Best Friends Imagine cartridge reminded me of B's coat so I was off and running with those elements.The rest was a bit harder, since the embellishments always throw me. Things never seem quite right and often just messy so my layouts tend to be pretty simple. I was glad to be able to print a few elements from my Imagine More cartridge to put a few bits on but otherwise...it's still basic, and the best part is the story.

One of my favorite parts of being a Mom is getting those tiny bouquets of flowers from little hands! One pretty day in April my girls and I were in the lawn just enjoying the day when B, not quiet two at the time, handed me her first ever gift of flowers. It was so lucky my camera was already out, so the moment she put the flowers in my hand was captured. I always try to cherish those moments, and it brings to mind one of my favorite Shaker hymns/poems called "Simple Gifts" I am grateful for my girls every day and grateful for daily reminders to remain so!

Friday, May 13, 2011

Me and My Helper...the photo shoot

This is her "funny face", thanks Dora! ;)

So, as a part of the Cricut's celebration of  National Scrapbooking Day, they wanted to see pictures of all us in our scrapbooking areas. This was actually one of the most difficult "challenges" so far. I don't like my picture taken. :(

So, you would think that since we actually had a whole week to submit photos I could A) dress up and put on some make-up, and generally look my best, B) Lose 5 lbs before the dreaded camera comes out, C) Have a quiet moment and give my best smile....well of course it was D) none of the above.

As always when I am in my scrapbooking room/office, everyone comes in to talk, etc. Which is great, but when the camera comes out as well, there is no way I am getting a picture of just me. :) I don't mind but some little three year olds don't hold still and smile, plus a  12 year old isn't the best photographer for flattering shots...and let's just add in me in my throw it on, run out the door clothes, no makeup, and half the day gone running around. :) It's just everyday me I smile the most when my girls are around anyway so it is what it is!. lol
B got bored and ran off...

But this isn't the best shot after all! :)

I have to admit, it wasn't as as painful as I thought it might be and talking about pictures with my girls was a real eye opener. My girls thinks I am pretty no matter what (although my oldest suggested lip gloss)  and after all it really shouldn't matter much beyond what my daughters think. I really need to get in the picture since I am in their memories after all. Don't forget to get into your pictures too!

Wednesday, May 11, 2011

Fast and Cute to boot!


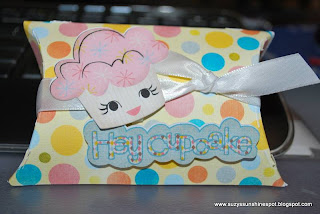
OK so I wanted to try to get ahead of "Birthday Season" at our house and also create something for a challenge submission at the same time, so out comes my Imagine and a few cartridges for a super fast project. The pillow bow is cut just right sized for a gift card from an original cricut cart I believe, not sure which one but probably All Wrapped Up,  and flood filled with a pattern from Imagine More Cards as well as the sentiment from the cart and then a cupcake from Better Together. The hey cupcake didn't have as much "personality to me so I separated the layers to just use the sentiment and with a different cupcake with a smile. :) I love you the Imagine can mix and match! And it was so easy to tape the one edge, pop the sides in and then place pop dots under the sentiment, add ribbon and done! Sorry for the lack of sizes but it's super easy to figure them using the preview screen on the I and now even the Expression 2 has one! How cool is that!? Enjoy....

Friday, May 6, 2011

Teacher Appreciation Week, Part 3


Well the last few gifts are done and Teacher Appreciation week is almost over. Yesterdays take in for the teachers was "fruit", while the the days big treat was a take home dessert.

G took a small container of blueberries to her teacher since she found out they were her favorite color (again with the color lol) and I hope she likes them. I saw the tape holding the blueberry container closed and knew it would come in handy! I simply used a scrap piece of cardstock and a printout sentiment punched out with the sticker on it, and just a sharpie to ink the edges...fast and easy!

For the dessert, I made some Apple Caramel coffee cake and embellished with some printed cutouts from Kates Kitchen and my Imagine. I cut down the chef's head and put the dessert saying on instead. :) I put that and the 100% little label on with pop dots and taped it all down! Found an easy way to keep plastic wrap in place by accident! I put one plate under the food, wrapped it up, then put another under that to hold everything in place. Definitely gonna have to use that again!

Lastly, our cards. Today, my DD and I sent in "notes" for the teacher. My G was very adamant  about the look of the card and wanted to do an A+ card she saw in the April Cricut Circle  Magazine, but she needed much more space to write, so she allowed some design changes. LOL! She picked out the papers and allowed me to put it together...She used every bit of the 8.5X5.5 space. G loves her teacher who she's had for two years now. This teacher is possibly one of the few lovely ladies who loves my G back nearly as much as I do. G is a bit of a character (think Ramona, Junie B Jones) and it takes a special teacher! We will miss her a ton!
So, finally my card to her teacher. Sad to say but after making 5 gallons of lemonade and running to the store at 5AM for ice, etc for the luncheon, I didn't leave enough time for her card. So I found this pretty flower partially made and just winged it. I cut the background, the butterfly and the sentiment out quickly not judging the sizes well apparently. :) Throw a few pop dots under the elements and Viola! SO this is what I came up with....not really any worse than one I would have slaved over and torn my hair out for, so this might be my new modus operandi!

Best of all it left time for my handwritten note. I put one of my favorite quotes inside. "We can do no great things, only small things with great love" by Mother Teresa. I surely know that when my daughter's teacher came into school each and every day, with very small actions but with great love of teaching and children, she had a great big impact on my daughter and me too. Thanks to all of you teachers out there who truly make a difference each and every day!!

PS  Look at how proud my teachers would be, using French, Latin and my lemonade escapade required lots of serial conversion and math!! :) Um, but please don't check my punctuation and grammar. Enjoy your day everyone!

Wednesday, May 4, 2011

Teacher Appreciation Week, Part 2

This was filled with Dove Chocolates!
This was for "school supplies" day
 Every year I work with the PTA to provide a week of appreciation for out Elementary teachers...but in the past that meant I would only give my daughter's teachers a note and a small token at the end of the week. This year I wanted my daughter to be able to take something in each day!

Our PTA sends home a note to parents giving them a suggestion for a small gift for each day. Monday was cut flowers(no picture sorry). Tuesday was sweet treats, Wednesday is "school supplies. Since I never seem to post until after the holiday I wanted to show what I've made so far...

Monday was a mad dash for my G to go out and cut five red tulips from around "her" tree. A tree we planted just for her, so she was excited to do it. I simply wrapped them in white tissue paper and tied it up with some pretty red satin ribbon. A friend had posted a link to a blog that supplied me with a PDF of tags. Of course she made some fabulous cupcakes you can see here at LivingLocurto.com. But I just printed the page on card stock and cheated by using my Stampin-up scalloped punch for the circular tag and stuck it on top of the ribbon LOL.

The next day was a box from Wrap-it-up cartridge cut at the max, 11.25 inches I believe. It was so easy to just put the red and green behind the apple cut out, and then I decided my project needed a bit more so I added ribbon and some faux stitching. Not so neatly, and after I saw the pic I noticed I missed one side! Opps! So the teacher was thrilled and G was thrilled, since my G did a bit of sleuthing to find out her teachers favorite color was that blue. :)

So Tuesday is "school supplies" day. Originally I wanted to do some very different projects but a sick kiddo necessitated some quick re-planning. It's OK, I had plenty of time to think while I lay awake with a three year old in bed with me. ;)
Just another view to show the sides....
 I did make the schoolhouse box I wanted from Wrap it Up again at fit to page...but I had to make a quick run to the grocery store of all places for some school supplies. I was thinking box mark, fancy paperclips, a clothespin magnet I saw someone else do. Alas, I had shrinky dinks and some odds and ends from the 24 hour grocery store at 5AM. I did find some magnet clips and paperclips and highlighters and post-its. Oh, and staples, which went unembellished.

The box needs very little tape and stand about 4 inches tall.


OK, so the box. It was a bit tricky to figure the layers. I wasn't too thrilled after all my planning to see the top portion had green showing through. :( Well the other layers I was able to fit and figure using design software, but it wasn't too easy.
Not thrill with the end result and I had to use my glue gun!

I like these apples. :)
My apple paper clips in a leftover bag and a topper. Before handwritten sentiment.


I was pretty happy with the magnetic clips but it took four tries to get the two of them finished And I had to break out my glue gun. Not my favorite tool. We just don't get along. As for the shrinky dinks, the white opauqe stuff just does not work well in the Imagine, but I found the "rough n ready" style which is roughed up on one side and looks slightly frosted is fabulous!

The apple is printed and cut from Kate's Kitchen on my Imagine. The apples on the white for the magnet clips are 4 inches while the clear ones on the paper clips are 4 and 3. I printed with best quality and both Matte and glossy finish settings and i didn't see too much difference in the finished product. It cut really well with a very sticky mat, on highest blade depth and highest pressure on 2 multicut. Honestly it may have cut through on one pass! The thing that made the biggest difference was creating an offset that was fairly wide to make the stem more secure. Some are cut closer to the apple and some with more of a border.

I also lowered the temp to 315 degrees instead of 325 as the package calls for since I was running back and forth to the Imagine and oven. I placed them on parchment paper and then placed another piece n top to keep curling at a minimum. I got these suggestions from the Cricut Circle blog and I think it really worked better than chasing the shrinky dinks around with the heat gun. :) It's much easier to time it right in the oven too. In the past I've found that overcooking them causes them to lose their shine, but they otherwise come out fine.

The paperclip apples I simply punched with a regular circle hole punch offset on the side, and then used a toothpick to push a small ribbon through after shrinking. It wasn't too difficult to tie a small knot then place them in a little leftover embellishment bag with a topper. I was most happy with this element of the project.

The two clips I got done are simply clipped onto the sides while the bag of apple paper clip/bookmarks are fit inside with the other supplies and tied together with a ribbon. Hope you enjoyed my projects!

Teacher Appreciation Week...Part 1

One of my springtime activities is the Teacher Appreciation crafted gifts from the PTA each year. There's a group of ladies who willingly help and craft about anything I throw at them! Together we assemble three gifts to place in the mailboxes on Mon/Tue/Wed. Then we put together a presentation for a gift card at the end of the year.

This year was a bit hectic but we managed to put together 84 of each gift! There is a set of three cards, a "pencil" made with a Hershey's Kiss, and a wrapped candy bar(not shown)...sorry for the poor pictures but they had to get out the door! :)

Fore the cards I used CTMH Fanfare collection papers and mixed it up with some stamps I've had. The basic blue with the stars is simply a cut from Stand and Salute cartridge and  some ribbon. The Sentiment and the red edges are cut the same size from Lacy Labels and then the red cut and offset. The final card has a CTMH sentiment and some of the leftover strips from the other projects. I was happy to be able to minimize the paper used and use almost every bit!

The pencil was a rectangle of yellow rolled around a mentos and a Hershey's kiss. I had seen some done with Rollos but the committee wanted to use a less expensive candy. It really was necessary to put a strip of tape onto the candy to hold it in, plus another bit to hold onto the kiss. I suggest using Rollos. LOL. Once we had it rolled up I put a strip of double sided scotch tape around it a bit from the end. That way i could place the pink on half of the tape and then the grey fit right under it. Just a bit of my favorite Sookwang tape held the edge of the strips of paper on the ends and along the last side of the yellow. These were probably the most challenging of the crafts.

The gift card holder is a 5 inch circle with the edges folded in. I scored them at 1.25 on three sides then secured it with a bit of tape and some ribbon. There is also a printed sentiment card in it with a stamped "picnic cloth." from a CTMH set. We had five teachers out on leave so they got a little "gift bag."

I think my favorite thing of all was working with some beautiful ribbon. It is from PaperMart  and you would never believe the price. I love to get some basic colors in bulk from them.The double sided satin was really soft and very pretty. I used a red and a white wide ribbon and then the striped for some fun...

Next my personal gifts to the teachers....

Friday, April 22, 2011

Yummy Bunnies


Funny how one thing leads to another and suddenly I am now creating fun food for my kids. :) Thanks to the fun blog community and my friends who alert me to many great new things, I have seen versions of bunnies everywhere.

Now, true to my nature I decided to look for a way I could make some treats with minimal skill or effort required. Ta Da...bunnies from mini donuts. I already had a few colors of gel frosting for writing on cakes so I used it with some pink Easter M&M's. I found out right away that gel icing does not like to stick to powdered sugar donuts but after a few attempts, easy!

On a side note. I made these today since my daughters each had friends sleep over. The 3 and 7 year olds were immediately excited but the 12-13 year olds were sorta cool about it. But, when they came for seconds...they requested bunnies too. Made me feel good they still have a bit more little girl in them! :)

Sunday, April 17, 2011

Tumbling Bunnies

This bunny and grass is all from Zooballo. Cut from Stampin up CS.


When I saw this craft at FamilyFun I knew I had to make them and had to do it with my Cricut. It was a pretty simple project to create with Plantin School Book which I will recreate with Goerge and try to post a file...

These bunnies will flip and tumble down after getting a bit of a head start and work best on a pillow propped up on the sofa. A few other tips for making these: Be sure to not forget the TWO marbles. ;). And be sure to use a fairly sturdy CS for the base.

It worked! Here is a link to 4Shared for the base cut file with Plantin Schoolbook... TumbleBunniesPS

Have Fun!!
Check out my Christmas version for other file types including an SVG file...
HERE
I use a ruler on top of my paper to line it up more easily. This actually helps a lot when scoring other 3D items with scoring at angles.

I used Sookwang tape which is similar to Scor tape or the Stampin up red tape. After lining up the edges with the sides,  simply press it down gently before adding marbles. The ends need to follow the curve so it can be tricky.

This cute little thing will briefly balance on end before flipping over.

Friday, April 8, 2011

Not exactly new...

I was recently chatting with a friend who wanted to make some cool accessories for parties like she sees in Etsy, which reminded me of our Valentines this year. G wanted to make her own, so we worked together to find just what she wanted. We came up with some cute tag pocket "cards" with a gift certificate for an ice cream cone, and an easy topper for her to glue on. It was so seriously easy, my three year old joined in to make some for her friends too. Amazingly I didn't blog them, but since it's a handy idea for all occasions I wanted to share anyway.

Instead of learning Photoshop which is an amazing tool that I don't have and have no idea how to use, I found some awesome clipart from Lettering Delights . G  picked out the images she was interested in then I set up a cut file in DS. The packet tag is from Tags Bags Boxes and More and the topper is Just Because Cards.

*edited to make this more understandable...hopefully

After I cut one set of the shape from Just Because Cards on a plain sheet of cardstock, I measured where the cuts ended up on the page.

Then I set up a MSWord document with a table, using the ruler on the side to help line up the borders of the table by adjusting the size of the rows and colums as well as the margins settings.

Then I place the clip art within the box of the table and play around with placement until I get the images right. You can play around with justification and use the space bar to move the clipart around. Be sure to set the tables rows and columns to exact size or it will adjust the size as you add elements.

A table allows you to copy and paste the whole clip art set and keep the spacing of the clipart consistent as you copy it to the next "box." This helps each set of images remain within the fixed border, and it will stay within the cut shape. You can use the leftover piece of cardstock to compare with a printed sheet before cutting to be sure you've aligned everything properly. Place the two pieces of cardstock together and be sure you can see your images wholly within the space left by the cut shape. Then you can place your printed paper on the mat to cut the shape around your printed images.

There is a bit of trial and error, and be sure to select "no borders" before you print!  After you have achieved the placement you'd like, you can print and cut a boatload! I made some of these in green and some pink for my two daughters as well as the Girl Scout troop and also a few neighbors(about 40). Happy Crafting!

Thanks for stopping by and adding your thoughts....

Blogaholic Designs”=